
CCV Renewal Project
Training Manual
CCV
Admin
Version 0.02
CCV Renewal Project
Training Manual
CCV
Admin
Version 0.02
Table of Contents
2.0 Functionality Description - CCV Admin
2.2 Navigation Flow for CCV Admin tool
3.1 CCV Admin – Contact Us Menu Item
3.1.1 CCV
Admin – Contact Us Page
3.2 CCV Admin - Login Menu Item
3.2.1 CCV Administration Login Page
3.3 CCV
Admin - Welcome Menu Item
3.3.1 CCV Admin - Welcome Page
3.3.2 CCV Admin – Change Admin Password Page
3.4 CCV Admin – Helpdesk Menu Item
3.4.1 CCV
Admin – Helpdesk Search / List Page
3.4.2 CCV Admin – Helpdesk
Details Page
3.5 CCV Admin – Funding Source Menu Item
3.5.1 Funding Source / Agencies Page
3.5.2 CCV Admin - Funding Source / Agency Details
Page
3.5.3 CCV Admin - Funding Source / Programs Page
3.5.4 CCV Admin - Funding Source / Program Details
Page
3.5.5 CCV Admin - Funding Source / Add Agency to
Program List Page
3.6 CCV Admin – Templates Menu Item
3.6.1 CCV Admin – Templates - SuperAdmin - Select
Funding Source Page
3.6.2 CCV Admin – Templates - List of Templates for a
Funding Source Page
3.6.3 CCV Admin – Templates - Add or Copy Template
Page
3.6.4 CCV Admin – Templates – Select Template to Copy
Page
3.6.5 CCV Admin – Template Details Page
3.6.6 CCV Admin – Template - Select Sections Page
3.6.7 CCV Admin – Template Section Details Page
3.6.8 CCV Admin – Template - Select Fields Page
3.6.9 CCV Admin – Template Field Details Page
3.7 CCV Admin – Submissions Menu Item
3.7.1 CCV Admin – Submissions - SuperAdmin - Select
Funding Source Page
3.7.2 CCV Admin - Submissions - Submissions for a
Funding Source Page
3.8 CCV Admin – Tables Menu Item
3.8.1 CCV Admin – Tables - LOV - Name Page
3.8.2 CCV Admin – Tables – LOV – List of Value
Details Page
3.8.3 CCV Admin – Tables – LOV - Element Details Page
3.8.4 CCV Admin – Tables - Dataset – Dataset Sections
Page
3.8.5 CCV Admin – Tables - Dataset – Section Details
Page
3.8.6 CCV Admin – Tables - Dataset – Add Field –
Select Display Type Page
3.8.7 CCV Admin – Tables - Dataset – Add LOV-type
Field - Select LOV Page
3.8.8 CCV Admin – Tables - Dataset – Add
Reference-type Field - Select Reference Page
3.8.9 CCV Admin – Tables - Dataset – Field Details
Page
3.8.10 CCV Admin – Tables - Dataset – Add LOV Value
Dependency - Select Field Page.
3.8.11 CCV Admin – Tables - Dataset – LOV Value
Dependency - Set Dependency Page
3.8.12 CCV Admin – Tables - Dataset – Add LOV Value to
Dependency List Page
3.8.13 CCV Admin – Tables - Dataset – PubMed-filled
Fields - add fields Page
3.8.14 CCV Admin – Tables - Dataset – Add Mutually
Exclusive Dependency Page
3.8.15 CCV Admin – Tables - Reference – Reference Table
Names Page
3.8.16 CCV Admin – Tables – Reference – Reference
Details Page
3.8.17 CCV Admin – Tables - Reference - Select Type of
Table Page
3.8.18 CCV Admin – Tables - Reference - Select Table
Page
3.8.19 CCV Admin – Tables - Reference - Select Values
to Manage Page
3.8.20 CCV Admin – Tables - Reference – Manage Values
Page
3.8.21 CCV Admin – Tables - Reference - Values Page
3.9 CCV Admin – Users Menu Item
3.9.1 CCV Admin – Users – SuperAdmin – Select Funding
Source Page
3.9.2 CCV Admin – List of
Admin Users Page
3.9.3 CCV Admin - Admin User
Details Page
3.9.4 CCV Admin – Select
Template to Include in Grid Page
3.10 CCV Admin – PIN Menu Item
3.10.1 CCV Admin - PIN Validation - Search and
Validate Page
3.11 CCV Admin – Statistics Menu Item
3.11.1 CCV Admin – Statistics –
System Page
3.11.2 CCV Admin – Statistics –
Usage Page
3.12 CCV Admin – Message Menu Item
3.12.1 CCV Admin – Message List
Page
3.12.2 CCV Admin – Message
Details Page
3.13 CCV Admin – Home Menu Item
3.13.1 CCV Admin – Select
Language Page
3.13.2 CCV Admin – Splash Page
List of Tables
Table 3-1 Fields on CCV Admin
– Contact Us screen....................................................... 1
Table 3-2 Fields on CCV Administration Login screen....................................................... 3
Table 3-3 Buttons on CCV Administration Login screen..................................................... 3
Table 3-4 Fields on CCV Admin Welcome screen............................................................. 6
Table 3-5 Buttons on CCV Admin Welcome screen.......................................................... 6
Table 3-6 Fields for CCV Admin – Change Admin Password
screen................................ 8
Table 3-7 Buttons for CCV Admin – Change Admin Password
screen............................. 8
Table 3-8 Fields for CCV Admin – Helpdesk Search / List
screen................................... 11
Table 3-9 Buttons for CCV Admin – Helpdesk Search /
List Validation screen............... 13
Table 3-10 Fields for Helpdesk Details screen................................................................. 15
Table 3-11 Buttons for Helpdesk Details screen............................................................... 17
Table 3-12 Fields for CCV Admin - Funding Source /
Agencies screen.......................... 23
Table 3-13 Buttons for CCV Admin - Funding Source /
Agencies screen....................... 23
Table 3-14 Fields for CCV Admin - Funding Source /
Agency Details screen................. 27
Table 3-15 Buttons for CCV Admin - Funding Source /
Agency Details screen.............. 31
Table 3-16 Fields for CCV Admin - Funding Source /
Programs screen......................... 34
Table 3-17 Buttons for CCV Admin - Funding Source /
Programs screen...................... 34
Table 3-18 Fields for CCV Admin - Funding Source /
Program Details screen............... 38
Table 3-19 Buttons for CCV Admin - Funding Source /
Program Details screen............ 40
Table 3-20 Fields for CCV Admin - Funding Source / Add
Agency to Program List screen 43
Table 3-21 Buttons for CCV Admin - Funding Source / Add
Agency to Program List screen 43
Table 3-22 Fields for CCV Admin - Templates -
SuperAdmin - Select Funding Source screen 47
Table 3-23 Buttons for CCV Admin - Templates - SuperAdmin
- Select Funding Source screen 47
Table 3-24 Fields for CCV Admin – Templates - List of
Templates for a Funding Source screen 49
Table 3-25 Buttons for CCV Admin – Templates - List of
Templates for a Funding Source screen 49
Table 3-26 Fields for CCV Admin – Templates - Add or
Copy Template screen............ 51
Table 3-27 Buttons for CCV Admin – Templates - Add or
Copy Template screen......... 52
Table 3-28 Fields for CCV Admin – Templates - Select
Template to Copy screen......... 54
Table 3-29 Buttons for CCV Admin – Templates - Select
Template to Copy screen...... 55
Table 3-30 Fields for CCV Admin – Template Details
screen.......................................... 57
Table 3-31 Buttons for CCV Admin – Template Details
screen....................................... 61
Table 3-32 Fields for CCV Admin – Template - Select
Sections screen......................... 65
Table 3-33 Buttons for CCV Admin – Template - Select
Sections screen....................... 66
Table 3-34 Fields for CCV Admin – Template Section
Details screen............................. 69
Table 3-35 Buttons for CCV Admin – Template Section
Details screen.......................... 70
Table 3-36 Fields for CCV Admin – Template - Select
Fields screen.............................. 73
Table 3-37 Buttons for CCV Admin – Template - Select
Fields screen........................... 74
Table 3-38 Fields for CCV Admin – Template Field
Details screen................................. 77
Table 3-39 Buttons for CCV Admin – Template Field
Details screen.............................. 79
Table 3-40 Fields for CCV Admin - Submissions -
SuperAdmin - Select Funding Source screen 83
Table 3-41 Buttons for CCV Admin - Submissions -
SuperAdmin - Select Funding Source screen 83
Table 3-42 Fields for CCV Admin - Submissions -
Submissions for a Funding Source screen 85
Table 3-43 Buttons for CCV Admin - Submissions -
Submissions for a Funding Source screen 86
Table 3-44 Fields for CCV Admin - Tables – LOV – Name
screen.................................. 93
Table 3-45 Buttons for CCV Admin - Tables – LOV – Name
screen............................... 93
Table 3-46 Fields for CCV Admin – Tables – LOV – List
of Value Details screen........... 95
Table 3-47 Buttons for CCV Admin – Tables – LOV – List
of Value Details screen........ 96
Table 3-48 Fields for CCV Admin – Tables – LOV -
Element Details screen.................. 98
Table 3-49 Buttons for CCV Admin – Tables – LOV -
Element Details screen............... 99
Table 3-50 Fields for CCV Admin - Tables – Dataset –
Dataset Sections screen......... 102
Table 3-51 Buttons for CCV Admin - Tables – Dataset –
Dataset Sections screen...... 102
Table 3-52 Fields for CCV Admin - Tables – Dataset –
Section Details screen............ 105
Table 3-53 Buttons for CCV Admin - Tables – Dataset –
Section Details screen.......... 106
Table 3-54 Fields for CCV Admin - Tables – Dataset –
Add Field – Select Display Type screen 109
Table 3-55 Buttons for CCV Admin - Tables – Dataset –
Add Field – Select Display Type screen 110
Table 3-56 Fields for CCV Admin - Tables – Dataset –
Add LOV-type Field - Select LOV screen 111
Table 3-57 Buttons for CCV Admin - Tables – Dataset –
Add LOV-type Field - Select LOV screen 112
Table 3-58 Fields for CCV Admin - Tables – Dataset –
Add Reference-type Field - Select Reference screen......................................................................................................................................... 113
Table 3-59 Buttons for CCV Admin - Tables – Dataset –
Add Reference-type Field - Select Reference screen.............................................................................................................................. 114
Table 3-60 Fields for CCV Admin - Tables – Dataset –
Field Details screen................. 116
Table 3-61 Buttons for CCV Admin - Tables – Dataset –
Field Details screen.............. 120
Table 3-62 Fields for CCV Admin - Tables – Dataset –
Add LOV Value Dependency - Select Field screen......................................................................................................................................... 125
Table 3-63 Buttons for CCV Admin - Tables – Dataset –
Add LOV Value Dependency - Select Field screen......................................................................................................................................... 126
Table 3-64 Fields for CCV Admin - Tables – Dataset –
LOV Value Dependency - Set Dependency screen......................................................................................................................................... 128
Table 3-65 Buttons for CCV Admin - Tables – Dataset –
LOV Value Dependency - Set Dependency screen......................................................................................................................................... 129
Table 3-66 Fields for CCV Admin - Tables – Dataset –
Add LOV Value to Dependency List screen 131
Table 3-67 Buttons for CCV Admin - Tables – Dataset –
Add LOV Value to Dependency List screen 132
Table 3-68 Fields for CCV Admin - Tables – Dataset –
PubMed-filled Fields - add fields screen 133
Table 3-69 Buttons for CCV Admin - Tables – Dataset –
PubMed-filled Fields - add fields screen 134
Table 3-70 Fields for CCV Admin - Tables – Dataset –
Add Mutually Exclusive Dependency screen 135
Table 3-71 Buttons for CCV Admin - Tables – Dataset –
Add Mutually Exclusive Dependency screen 136
Table 3-72 Fields for CCV Admin - Tables – Reference –
Reference Table Names screen 138
Table 3-73 Buttons for CCV Admin - Tables – Reference –
Reference Table Names screen 138
Table 3-74 Fields for CCV Admin – Tables – Reference –
Reference Details screen.. 140
Table 3-75 Buttons for CCV Admin – Tables – Reference –
Reference Details screen 140
Table 3-76 Fields for CCV Admin - Tables – Reference -
Select Type of Table screen 143
Table 3-77 Buttons for CCV Admin - Tables – Reference -
Select Type of Table screen 144
Table 3-78 Fields for CCV Admin - Tables – Reference -
Select Table screen............ 145
Table 3-79 Buttons for CCV Admin - Tables – Reference -
Select Table screen.......... 146
Table 3-80 Fields for CCV Admin - Tables – Reference -
Select Values to Manage Window screen 148
Table 3-81 Buttons for CCV Admin - Tables – Reference -
Select Values to Manage Window screen 148
Table 3-82 Fields for CCV Admin - Tables – Reference –
Manage Values screen....... 151
Table 3-83 Buttons for CCV Admin - Tables – Reference –
Manage Values screen.... 151
Table 3-84 Fields for CCV Admin - Tables – Reference –
Values screen..................... 154
Table 3-85 Buttons for CCV Admin - Tables – Reference –
Values screen.................. 154
Table 3-86 Fields for Search and Select screen............................................................. 157
Table 3-87 Buttons for Search and Select screen.......................................................... 158
Table 3-88 Fields for CCV Admin – Users – SuperAdmin –
Select Funding Source screen 160
Table 3-89 Buttons for CCV Admin – Users – SuperAdmin –
Select Funding Source screen 160
Table 3-90 Fields for CCV Admin – List of Admin Users
screen................................... 163
Table 3-91 Buttons for CCV Admin – List of Admin Users
screen................................. 163
Table 3-92 Fields for CCV Admin - Admin User Details
screen..................................... 166
Table 3-93 Buttons for CCV Admin - Admin User Details screen.................................. 167
Table 3-94 Fields for CCV Admin – Select Template to
Include in Grid screen............ 170
Table 3-95 Buttons for CCV Admin – Select Template to
Include in Grid screen......... 171
Table 3-96 Fields for CCV Admin - PIN Validation -
Search and Validate screen......... 174
Table 3-97 Buttons for CCV Admin - PIN Validation -
Search and Validate screen...... 174
Table 3-98 Fields for CCV Admin – Statistics – System
screen.................................... 178
Table 3-99 Buttons for CCV Admin – Statistics – System
screen................................. 179
Table 3-100 Fields for CCV Admin – Statistics – Usage
screen.................................... 182
Table 3-101 Buttons for CCV Admin – Statistics – Usage
screen................................. 184
Table 3-102 Fields for CCV Admin – Message List screen............................................ 186
Table 3-103 Buttons for CCV Admin – Message List screen......................................... 186
Table 3-104 Fields for CCV Admin – Message Details
screen...................................... 189
Table 3-105 Buttons for CCV Admin – Message Details
screen.................................... 190
Table 3-102 Fields for CCV Admin – Select Language
screen...................................... 192
Table 3-103 Buttons for CCV Admin – Select Language
screen................................... 193
Table 3-104 Fields for CCV Admin – Splash screen...................................................... 194
Table 3-105 Buttons for CCV Admin – Splash screen................................................... 194
List of Figures
Figure 2-1 Legend of figures used
within the diagrams...................................................... 5
Figure 2-2 Navigation Flow through CCV Admin................................................................ 6
Figure 3-1 CCV Admin – Contact Us Window.................................................................... 1
Figure 3-2 CCV Administration Login Window.................................................................... 2
Figure 3-3 CCV Admin Welcome Window......................................................................... 5
Figure 3-4 CCV Admin – Change Admin Password Window............................................. 7
Figure 3-5 CCV Admin – Helpdesk Search / List Window............................................... 11
Figure 3-6 CCV Admin – Helpdesk Details Window......................................................... 15
Figure 3-7 Navigation Flow of CCV Admin Tool – Funding
Source menu item, Agency sub-menu item 20
Figure 3-8 Navigation Flow of CCV Admin Tool – Funding
Source menu item, Program sub-menu item 21
Figure 3-9 CCV Admin - Funding Source / Agencies Window......................................... 22
Figure 3-10 CCV Admin - Funding Source / Agency Details Window............................. 26
Figure 3-11 CCV Admin - Funding Source / Programs Window...................................... 33
Figure 3-12 CCV Admin - Funding Source / Program Details Window............................ 37
Figure 3-13 CCV Admin - Funding Source / Add Agency to Program List Window........ 43
Figure 3-14 Navigation Flow of CCV Admin Tool –
Templates menu item..................... 45
Figure 3-15 CCV Admin - Templates - SuperAdmin -
Select Funding Source Window.. 46
Figure 3-16 CCV Admin – Templates - List of Templates
for a Funding Source Window 48
Figure 3-17 CCV Admin – Templates - Add or Copy
Template Window......................... 51
Figure 3-18 CCV Admin – Templates - Select Template to
Copy Window..................... 53
Figure 3-19 CCV Admin – Template Details Window....................................................... 56
Figure 3-20 CCV Admin – Template - Select Sections
Window...................................... 64
Figure 3-21 CCV Admin – Template Section Details
Window......................................... 68
Figure 3-22 CCV Admin – Template - Select Fields
Window........................................... 72
Figure 3-23 CCV Admin – Template Field Details Window.............................................. 76
Figure 3-24 Navigation Flow of CCV Admin Tool –
Submissions menu item.................. 80
Figure 3-25 Flow of a Submission through all of its
Transmission States........................ 81
Figure 3-26 CCV Admin - Submissions - SuperAdmin -
Select Funding Source Window 82
Figure 3-27 CCV Admin - Submissions - Submissions for a Funding Source Window... 84
Figure 3-28 Navigation Flow of CCV Admin Tool – Tables
menu item – LOV sub-menu item 89
Figure 3-29 Navigation Flow of CCV Admin Tool – Tables
menu item – Dataset sub-menu item 90
Figure 3-30 Navigation Flow of CCV Admin Tool – Tables
menu item – Reference sub-menu item 91
Figure 3-31 CCV Admin - Tables – LOV – Name Window.............................................. 92
Figure 3-32 CCV Admin – Tables – LOV – List of Value
Details Window........................ 94
Figure 3-33 CCV Admin – Tables – LOV - Element Details
Window............................... 98
Figure 3-34 CCV Admin - Tables – Dataset – Dataset
Sections Window...................... 101
Figure 3-35 CCV Admin - Tables – Dataset – Section
Details Window......................... 104
Figure 3-36 CCV Admin - Tables – Dataset – Add Field –
Select Display Type Window 109
Figure 3-37 CCV Admin - Tables – Dataset – Add
LOV-type Field - Select LOV Window 111
Figure 3-38 CCV Admin - Tables – Dataset – Add
Reference-type Field - Select Reference Window 113
Figure 3-39 CCV Admin - Tables – Dataset – Field
Details Window.............................. 115
Figure 3-40 CCV Admin - Tables – Dataset – Add LOV
Value Dependency - Select Field Window 125
Figure 3-41 CCV Admin - Tables – Dataset – LOV Value
Dependency - Set Dependency Window 127
Figure 3-42 CCV Admin - Tables – Dataset – Add LOV
Value to Dependency List Window 131
Figure 3-43 CCV Admin - Tables – Dataset –
PubMed-filled Fields - add fields Window 133
Figure 3-44 CCV Admin - Tables – Dataset – Add
Mutually Exclusive Dependency Window 135
Figure 3-45 CCV Admin - Tables – Reference – Reference
Table Names Window..... 137
Figure 3-46 CCV Admin – Tables – Reference – Reference
Details Window............... 139
Figure 3-47 CCV Admin - Tables – Reference - Select
Type of Table Window............ 143
Figure 3-48 CCV Admin - Tables – Reference - Select
Table Window......................... 145
Figure 3-49 CCV Admin - Tables – Reference - Select
Values to Manage Window (example of screen for definition of Sector-Field
Reference table with high-level LOV type of field)................. 147
Figure 3-50 CCV Admin - Tables – Reference - Select
Values to Manage Window (example of screen for definition of
Sector-Field-Discipline Reference table with high-level Reference type of
field) 148
Figure 3-51 CCV Admin - Tables – Reference – Manage
Values Window with example of managing values for the Sector-Field-Discipline
reference table for a specified Sector and Field value.. 150
Figure 3-52 CCV Admin - Tables – Reference - Values
Window.................................. 153
Figure 3-53 Search and Select Window (example with a
high level LOV type of field). 156
Figure 3-54 Search and Select Window (example with a
high level Reference type of field) 157
Figure 3-55 Navigation Flow for CCV Admin – Users menu
item.................................. 159
Figure 3-56 CCV Admin – Users – SuperAdmin – Select
Funding Source Window..... 160
Figure 3-57 CCV Admin - List of Admin Users Window................................................. 162
Figure 3-58 CCV Admin – Admin User Details Window................................................. 165
Figure 3-59 CCV Admin – Select Template to Include in
Grid Window......................... 170
Figure 3-60 Navigation Flow of CCV Admin Tool – PIN
menu item.............................. 172
Figure 3-61 CCV Admin - PIN Validation - Search and Validate Window...................... 173
Figure 3-62 CCV Admin – Statistics - System Window.................................................. 177
Figure 3-63 CCV Admin – Statistics - Usage Window.................................................... 181
Figure 3-64 CCV Admin – Message List Window........................................................... 185
Figure 3-65 CCV Admin – Message Details Window..................................................... 188
Figure 3-64 CCV Admin – Select Language Window..................................................... 192
Figure 3-65 CCV Admin – Splash Window..................................................................... 194
The purpose of this document is to train the CCV Admin users in how to use the new Common CV (CCV) application for the CCV Admin functional area. It provides a description of the functionality by menu item, and by screen within each menu item.
This document is organized in the following manner:
Section 1 – Introduction
This section provides the purpose of this document, an overview of its structure and a listing of its references.
Section 2 – Function Description
This section provides an overview of the CCV Admin functions and the high-level navigation flow of the CCV Admin functional area.
Section 3 – User Interface Details
This section provides an overview of the functionality for each menu item in the CCV Admin functional area as well as a navigation flow of its screens. It provides an explanation of how to use the CCV Admin screens, with the following details for each screen:
1.
Overview: describes the functionality provided by this
screen.
2.
Presentation: contains a mock-up of the screen layout.
3.
Validation: describes the validation rules for each data element on the screen.
4.
Action / Command Button: identifies the functionality invoked by pressing a button or icon
or by selecting a menu item.
References used for this document include:
· CCV Data Set, v1.0 June 15, 2010
· CCV Business Requirements
· Mock-up Business Rules
· CCV-P490-02-01 Manage System Admin
· CCV-P490-02-02 Manage Dataset and LOV Tables
· CCV-P490-02-03 Manage Funding and Submission
· CCV-P490-02-04 Manage Template
· CCV-P490-02-05 Manage Reference Tables
· CCV-P490-02-06 Manage Report Services
·
CCV-P490-02-07 Manage CCV
Services
·
CCV-P490A Messages for CCV and
CCV Admin
None.
The CCV Admin tool allows an Admin user to perform many administrative tasks. These tasks are grouped into functions that are accessible by selecting a menu item. The menu items that are displayed and accessible will be dependent on the Admin user’s role and most are only available after successful login. The complete list of CCV Admin menu items is:
This
menu item is only shown if the current language of the screen is French. When
pressed, the language of the screen is changed to English and the first screen
for the applicable menu item is displayed.
This
menu item is only shown if the current language of the screen is English. When
pressed, the language of the screen is changed to French and the first screen
for the applicable menu item is displayed.
This
menu item is always shown. When pressed, it displays the CCV Admin Splash page.
Contact
us
This
menu item is always shown. When pressed, it displays the CCV Admin Contact page
as defined in this document.
Help
This
menu item is always shown. When pressed, it opens a window to display this CCV
Admin training manual.
Login
This
menu item is only shown if the user is not logged in. When pressed, it displays
the CCV Admin - Login page as defined in this document.
Logout
This
menu item is only shown if the user is logged in. When pressed, it automatically
logs the user out of the CCV Admin application and displays the CCV Admin Splash
page as defined in this document.
Welcome
This
menu item is only shown if the user is logged in. When pressed, it displays the
CCV Admin Welcome page as defined in this document.
Helpdesk
This
menu item is only shown if the user is logged in with the SuperAdmin, Helpdesk,
Agency or Program role. When pressed, it displays the CCV Admin Helpdesk page
as defined in this document.
Funding Source
This
menu item is only shown if the user is logged in with the SuperAdmin role. When
pressed, it displays the CCV Admin Funding Source sub-menu items as defined in
this document.
Templates
This
menu item is only shown if the user is logged in with the SuperAdmin, Helpdesk,
Agency or Program role. When pressed, it displays the CCV Admin Template page that
is appropriate to the user’s role, as defined in this document.
Submissions
This
menu item is only shown if the user is logged in with the SuperAdmin, Agency,
Program or CV Reviewer role. When pressed, it displays the CCV Admin
Submissions for a Funding Source page, as defined in this document.
Tables
This
menu item is only shown if the user is logged in with the SuperAdmin or Agency role.
When pressed, it displays the CCV Admin Tables menu, as
defined in this document. For a SuperAdmin, all sub-menu items will be shown. For
an Agency Admin role, only the CCV Admin Reports sub-menu item will be shown.
Users
This
menu item is only shown if the user is logged in with the SuperAdmin, Agency or
Program role. When pressed by a user with the SuperAdmin role, it displays the
CCV Admin – Users – SuperAdmin – Select Funding Source page, described in this
document; otherwise, for a user with the Program or Agency role, displays the
CCV Admin – List of Admin Users page, described in this document.
PIN
This
menu item is only shown if the user is logged in with the SuperAdmin, Helpdesk or
Agency role. When pressed, it displays the CCV Admin PIN Validation – Search
and Validate page, as defined in this document.
Statistics
This
menu item is only shown if the user is logged in with the SuperAdmin, Agency or
Program role. When pressed, it displays the CCV Admin Statistics sub-menu
items, as described in this document.
Messages
This
menu item is only shown if the user is logged in with the SuperAdmin role. When
pressed, it displays the CCV Admin – Message List page as defined in this
document.
The legend below describes the figures used within the diagrams contained in this document.
Figure 2-1 Legend of figures used within the diagrams

The figure below illustrates the window navigation flow through the CCV Administration Tool
Figure 2-2
Navigation Flow through CCV Admin

Pressing the Contact Us menu item opens this window which displays the
contact information for the CCV helpdesk.
Figure 3-1 CCV Admin –
Contact Us Window

Table 3-1 Fields on CCV Admin – Contact Us screen
|
Field |
Validation Rules |
|
CCV Helpdesk |
Display only |
|
Acronym |
Display only |
|
Name |
Display only |
|
Phone |
Display only |
|
|
Display only |
None.
This window is
displayed to allow the Admin user to log into the application. The Admin user
name and password were emailed to the user when the username was generated. The
Admin user may have changed his/her password by pressing the Change Password
button on the Welcome screen.
The user must enter
his/her username and password and press the Login button. If the combination of
username and password is valid, the user will proceed to the Welcome window;
otherwise, the user will see an error message and remain on the Login screen.
Figure 3-2 CCV Administration Login
Window
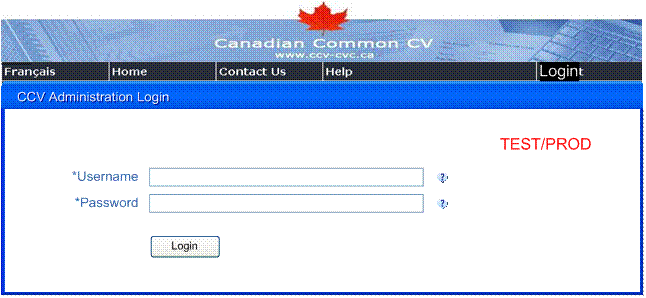
Table 3-2 Fields
on CCV Administration Login screen
|
Field |
Validation Rules |
|
Username |
Mandatory Not case-sensitive |
|
Password |
Mandatory Case-sensitive |
Table 3-3 Buttons
on CCV Administration Login screen
|
Button |
Functionality |
|
Login |
If validation is successful, displays the CCV Admin Welcome page; otherwise remains on Login
screen and displays applicable error message(s). |
If the user logged in
successfully, the welcome screen will be displayed with a listing of roles granted
to the user. The menu items will be displayed
or hidden based on the role(s) of the user. The user may press the Change
Password button to open the Change Admin Password page where they can change
their password if they wish.
Figure 3-3 CCV Admin Welcome Window

Table 3-4 Fields
on CCV Admin Welcome screen
|
Field |
Validation Rules |
|
Welcome |
Display only |
|
<First Name> |
Display only of first name for Admin User logged in. |
|
<Family Name> |
Display only of family name for Admin User logged in. |
|
<Date> |
Display only of system date. |
|
<Funding Source> |
Display only of Acronym of Funding Source associated to the non-SuperAdmin User. If user has SuperAdmin role, do not display. |
|
Logged In |
Display only of list of roles for Admin user logged in. |
Table 3-5 Buttons on CCV Admin Welcome screen
|
Button |
Functionality |
|
Change Password button |
Displays the Change Admin Password page. |
On this page, the user may change their password by entering their old password as well as entering their new password (in the New Password and the Confirm Password fields) and pressing the Save button. The new password must meet the password constraints of the system to be valid. The user may press the ‘?’ icon beside the New Password field to see the password constraints.
Figure 3-4 CCV Admin – Change Admin
Password Window
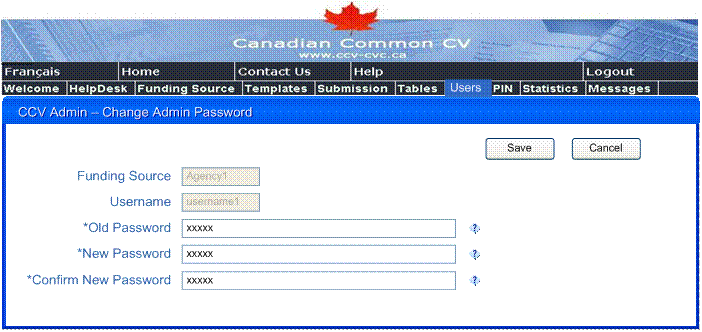
Table 3-6
Fields for CCV Admin – Change Admin Password screen
|
Field |
Validation Rules |
|
Funding Source |
Display only |
|
Username |
Display only |
|
Old Password |
Mandatory Must match user’s current password Case-sensitive |
|
New Password |
Mandatory Must meet password constraints Case-sensitive |
|
Confirm New Password |
Mandatory Must match New Password entered Case-sensitive |
Table 3-7
Buttons for CCV Admin – Change Admin Password screen
|
Button |
Functionality |
|
Save |
Validates the data
entered: If at least one
validation fails, ·
Displays
the appropriate message Otherwise, · Saves the data entered on the current page to the database. · Returns to the CCV Admin - Welcome Page refreshing the display of the screen. |
|
Cancel |
Returns to the CCV Admin - Welcome Page without saving any data entered on the current page. |
|
? |
Displays the help for the selected entry. |
This menu item allows
the user to find an application user in order to view their details or reset
their password or access their CV in read-only mode or even delete the
application user.
This screen allows the
user to enter criteria in zero or more of the fields in the top portion of the
screen to will be used to populate the Application Users grid with matching
entries. The search will use ‘contains’ and ‘and’ functionality (e.g. if user
enters First Name = ‘Jo’ and Month of Birth = ‘August’, only those application
users with Month of birth = ‘August’ and First Name containing ‘Jo’ (e.g. Joe
or Joseph or Joanna, etc.) would be returned when the Search button is pressed.
If no data is entered in the fields and the Search button is pressed, a listing
of all application users will be displayed.
Note: there is a
limitation of only 200 results returned. Therefore if the search returns over
200 results, only the first 200 will be returned, and a message requesting the
user to re-enter their criteria to refine the search.
Figure 3-5 CCV Admin – Helpdesk
Search / List Window
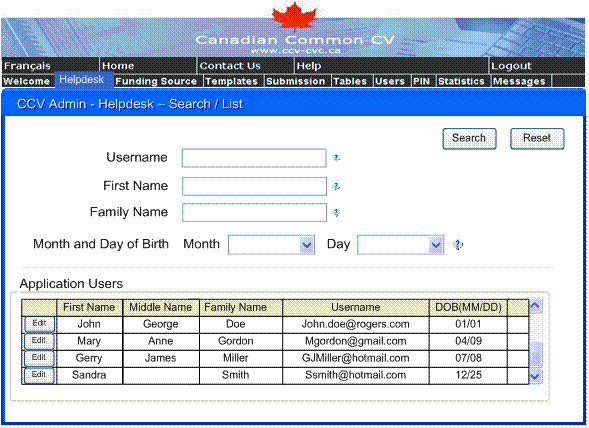
Table 3-8
Fields for CCV Admin – Helpdesk Search / List screen
|
Field |
Validation Rules |
|
Username |
Optional If any data is entered, this search criterion will be used to search for all Application users where the user’s username (i.e. email) contains this text. Note that a search using this parameter is not case-sensitive. |
|
First Name |
Optional If any data is entered, this search criterion will be used to search for all Application users where the user’s first name contains this text. Note that a search using this parameter is not case-sensitive. |
|
Family Name |
Optional If any data is entered, this search criterion will be used to search for all Application users where the user’s last name contains this text. Note that a search using this parameter is not case-sensitive. |
|
DOB Month |
Optional If any option is selected, this search criterion will be used to search for all Application users where the selection matches the user’s Date of Birth month. |
|
DOB Day |
Optional If any option is selected, this search criterion will be used to search for all Application users where the selection matches the user’s Date of Birth day. |
|
Application Users |
Display only of all Application users (i.e. researchers) satisfying the search criteria. |
|
First Name |
Display only of first name of researcher |
|
Middle Name |
Display only of middle name of researcher |
|
Family Name |
Display only of family name of researcher |
|
Username |
Display only of username (i.e. email) of researcher |
|
DOB (MM/DD) |
Display only of Birth Month/Day of researcher |
|
Errors |
Display only of icon in the event of a validation error for the associated grid entry. |
Table 3-9
Buttons for CCV Admin – Helpdesk Search / List Validation screen
|
Button |
Functionality |
|
Search button |
Performs a search to populate the search
results (Application Users) grid with all users that match the search
criteria. Note: When the user
presses Search, the result set will be determined; if the search returns over
200 results, only the first 200 will be returned, as well as a message requesting
them to re-enter their criteria to refine the search. |
|
Edit icon for an entry in the Application
Users grid |
Displays the CCV Admin – Helpdesk Details
page for the selected Admin User. |
|
Reset button |
Resets the search criteria fields to their
default values and empties the search results (Application Users) grid. |
|
? |
Displays the help for the selected entry. |
This window displays
the details of the selected application user. On this window, the admin user
may access the user’s generic or funding CV in read only mode, reset their
password, change the application user’s email address (which in turn changes
the user’s username so the user will need to use this new username at the next
login) or delete the user if the user has requested to be removed from the CCV.
Th Admin user must confirm that the user knows the answers to both of the
reminder questions (i.e. both Confirmation 1 and Confirmation 2 must = ‘yes’)
to be able to reset the user’s password or save a change to the user’s email address.
Note: if the
application user has requested to be removed from the CCV application and they
have already submitted CV’s to any agency, they will not be deleted from the
application but will instead be de-activated. If a user has been de-activated,
they can not log in or use the application. They must call the helpdesk to
request a re-activation. The admin user can (if they choose to) re-activate a
de-activated application user by pressing the Reset Password button on this
screen for the applicable user.
Figure 3-6 CCV Admin – Helpdesk
Details Window

Table 3-10 Fields
for Helpdesk Details screen
|
Field |
Validation Rules |
|
Username |
Display only of user’s username (i.e. email) |
|
Title |
Display only of user’s title |
|
First Name |
Display only of user’s first name |
|
Middle Name |
Display only of user’s middle name |
|
Family Name |
Display only of user’s family name |
|
|
Mandatory Must be valid email format |
|
Confirm Email |
Mandatory Must be valid email format and must equal Email entity |
|
Month and Day of Birth |
Display only of user’s month and day of birth |
|
Month |
Display only of user’s month of birth |
|
DD |
Display only of user’s day of birth |
|
Correspondence Language |
Display only of user’s selected correspondence language. |
|
Reminder Question 1 |
Display only of user’s Reminder Question 1. |
|
Answer1 |
Display only of user’s Answer 1. |
|
Confirmation 1 |
Yes must be selected to indicate admin user confirmed answer 1 with researcher. |
|
Reminder Question 2 |
Display only of user’s Reminder Question 2. |
|
Answer2 |
Display only of user’s Answer 2. |
|
Confirmation 2 |
Yes must be selected to indicate admin user confirmed answer 2 with researcher. |
|
Allow Duplicate |
If Yes is selected, it means that another user with the same First and Last names and Month and Day of birth can be added to the CCV application as long as the email address is different. The default and recommended value is No. |
Table 3-11 Buttons for Helpdesk Details screen
|
Button |
Functionality |
|
Access Funding CV |
Validates the data entered: If at least one validation fails, · Displays the appropriate message(s); Otherwise, if validation is successful: · Saves any data changes to database; and · Displays Funding CV – Select Funding Source window in View only mode displaying details for the selected user. |
|
Access Generic CV |
Validates the data entered: If at least one validation fails, · Displays the appropriate message(s); Otherwise, if validation is successful: · Saves any data changes to database; and · Displays Generic CV – List of Sections window in View only mode displaying details for the selected user. |
|
Reset Password |
Displays a
confirmation screen with ‘Yes’ and ‘No’ options: If ‘No’ is selected:
·
Returns to
this screen. Otherwise, if ‘Yes
is selected: Validates the data entered: If at least one validation fails, · Displays the appropriate message(s); Otherwise, if validation is successful: · Generates a random 8-digit password using a secure algorithm and stores on user account table; · Generates and sends an email to the user’s email address with title ‘CCV Support’ containing the newly generated password: · Saves any data changes to database; · Redisplays the current screen with a message indicating the success or failure of the password reset. |
|
Delete User |
Displays a
confirmation screen with ‘Yes’ and ‘No’ options’: If ‘No’ is selected:
·
Redisplays
this screen. Otherwise: Validates the data entered: If at least one validation fails, · Displays the appropriate message(s) on the current screen; Otherwise, if validation is successful: · Checks to see if user has submitted any CVs: If user has no submitted CVs, the user is deleted from the CCV, an email is sent to notify him/her, and the CCV Admin – Helpdesk Search / List window is displayed. Otherwise, if user has associated submitted CVs, the user is deactivated in the CCV, and the CCV Admin – Helpdesk Search / List window is displayed. |
|
Done |
Validates any data entered: If at least one validation fails, · Displays the appropriate message(s); Otherwise, if validation is successful: · Saves any data changes to database; and · Returns to and displays CCV Admin – Helpdesk Search / List window with the data refreshed. |
|
Undo |
Disabled upon first entry to the screen and
whenever a save is posted to the database. Enabled as soon as any changes are made to
the fields on this screen. When selected, it undoes any changes made to the fields on the current screen since the last database save, disables the Undo button; and redisplays this screen. |
|
Prev |
Returns to and displays CCV Admin – Helpdesk Search / List window without saving any changes to data entered on this screen. |
|
? |
Displays the help for the selected entry. |
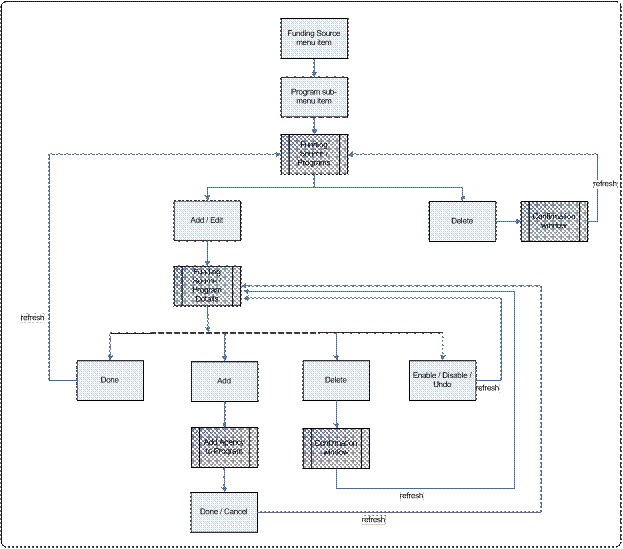
The user selects this menu item when (s)he wants to add, modify or delete a Funding Source (i.e. Agency or Program).
The figure below illustrates the window navigation flow through the CCV Administration application – Funding Source menu item.
Figure 3-7
Navigation Flow of CCV Admin Tool – Funding Source menu item, Agency sub-menu
item
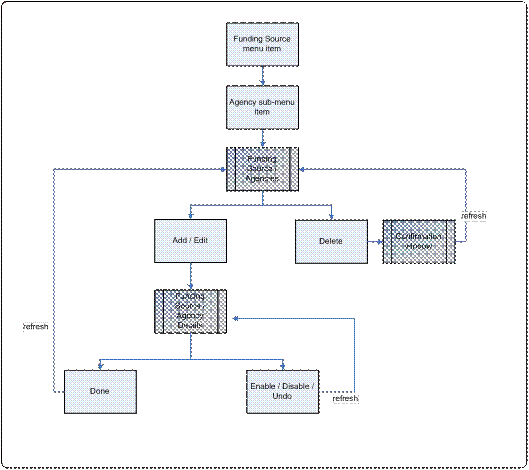
Figure 3-8
Navigation Flow of CCV Admin Tool – Funding Source menu item, Program sub-menu
item
If a SuperAdmin user selects the Funding Source menu item / Agency sub-menu item intending to add, edit or delete an agency, this screen is displayed. Only agencies that are enabled and where the current date is between or equal to the agency’s Start and End Dates will be displayed in the Funding Source or Agency drop-downs on the Manage CV screens. (A blank start date is invalid, but a blank end date means there is no end date set, so it will be active if it is enabled and the current date is greater than or equal to the start date).
Note: an agency cannot be deleted if it is the generic CCV agency or if it is used in the system (i.e. is associated to any submissions or Programs or to any active templates). If the agency is not the generic CCV agency and has no associated submissions, the agency can be removed from associated programs by accessing the Funding Source / Programs menu item; and any associated active templates can be deactivated by accessing the Templates menu item and disabling those that are preventing the agencies from being deleted.
Figure 3-9 CCV Admin - Funding Source / Agencies Window
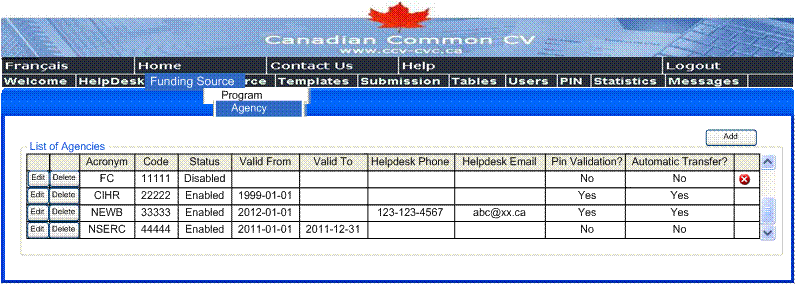
Table 3-12 Fields for CCV Admin - Funding Source /
Agencies screen
|
Field |
Validation Rules |
|
List of Agencies |
Sorted alphabetically by Acronym (by English Agency Acronym if on English screen, and by French Agency Acronym if on French screen). |
|
Acronym |
Display only of English Agency Acronym if on English screen, and French Agency Acronym if on French screen. |
|
Code |
Display only of Agency Code. Numeric |
|
Status |
Display only of Status of Agency. ‘Enabled’ or ‘Disabled’ |
|
Valid From |
Display only of Valid From Date of Agency. YYYY-MM-DD |
|
Valid To |
Display only of Valid To Date of Agency. YYYY-MM-DD |
|
Helpdesk Phone |
Display only of English or French Helpdesk Phone Number of Agency depending on the language of the UI. |
|
Helpdesk Email |
Display only of English or French Helpdesk email address of Agency depending on the language of the UI. |
|
PIN Validation? |
Display only of PIN Validation field for Agency. ‘Yes’ or ‘No’ |
|
Automatic Transfer? |
Display only of Automatic Transfer field for Agency. ‘Yes’ or ‘No’ |
|
Errors |
Display only of icon in the event of a validation error for the associated grid entry. |
Table 3-13 Buttons for CCV Admin - Funding Source /
Agencies screen
|
Button |
Functionality |
|
Add |
Displays the Funding
Source / Agency Details page in Add mode. |
|
Edit |
Displays the Funding Source / Agency Details page in Edit mode for
the selected Agency. |
|
Delete |
Displays a
confirmation screen with ‘Yes’ and ‘No’ options: If
‘No’ is selected, returns control to the current screen; Otherwise,
if ‘Yes’ is selected: ·
Validates if the selected Agency is the ‘CCV’
(based on the system ID) because it cannot be deleted; ·
Otherwise, if the selected Agency is not the ‘CCV’ (based on the system ID),
validates if the selected Agency is linked to an active template or a
submission in the database or if the Agency is linked to a Program because then
the Agency cannot be deleted; ·
Otherwise, if the selected Agency is not the ‘CCV’
and is not linked to a submission or an active template in the database or to
a Program: Ø Deletes the selected Agency, its associated Templates
and Admin Users (Agency, Template and Helpdesk) from the database as well as
any links to Program Admin Users; and Ø Redisplays this screen. |
This screen is used to
add and modify details of a selected agency.
The user can select the Enable button to change the status of this
agency when it is time to allow it to be displayed in the Funding Source and
Agency drop-downs on the Manage CV screens. The SuperAdmin may press the Test
Secure FTP Link button to test the transfer link connectivity using the entered
Transfer Link Server/IP, Transfer Username, Transfer Password and
Figure 3-10 CCV Admin - Funding Source / Agency Details Window

Table 3-14 Fields for CCV Admin - Funding Source / Agency
Details screen
|
Field |
Validation Rules |
|
Status |
Display only of Status of Agency. If the Status of the Agency is ‘Disabled’, then it will not be displayed in the Funding Source drop-down lists on the Template and CV screens. Note: If Acronym = ‘CCV’, it cannot be enabled. |
|
Code |
Display only of Agency Code. When a new Agency is created, this code will be assigned based on a sequence generator. |
|
Valid From |
Mandatory When text box is selected, calendar date picker opens up. If user selects a date using the date picker, it will populate the text box. User can over-type date in text box. Must be a valid date. |
|
Valid To |
Optional When text box is selected, calendar date picker opens up. If user selects a date using the date picker, it will populate the text box. User can over-type date in text box. Must be a valid date that is greater than or equal to the Valid From Date. |
|
English Acronym |
Mandatory |
|
French Acronym |
Mandatory |
|
English Name |
Mandatory |
|
French Name |
Mandatory |
|
English Website |
Optional If entered, must be valid URL format (i.e. Must be http or https lowercase with a “://” and may or may not have “www” e.g. http://ccv-cvc-admin.ca or http://www.ccv-cvc-admin.ca or https://ccv-cvc-admin.ca or https://www.ccv-cvc-admin.ca ). |
|
French Website |
Optional If entered, must be valid URL format (i.e. Must be http or https lowercase with a “://” and may or may not have “www” e.g. http://ccv-cvc-admin.ca or http://www.ccv-cvc-admin.ca or https://ccv-cvc-admin.ca or https://www.ccv-cvc-admin.ca). |
|
English Logo |
Optional User may click file browser icon to select a file. Text box will be filled with selected file name. Logo in file will be stored as a Blob. Logo file size must be less than 25 K. Logo file extension must be gif, png, jpg or jpeg. Once loaded, logo will be displayed beneath the text box and file name will disappear. |
|
French Logo |
Optional User may click file browser icon to select a file. Text box will be filled with selected file name. Logo in file will be stored as a Blob. Logo file size must be less than 25 K. Logo file extension must be gif, png, jpg or jpeg. Once loaded, logo will be displayed beneath the text box and file name will disappear. |
|
English Helpdesk Email |
Optional If entered, must be valid email format. If invalid format. |
|
French Helpdesk Email |
Optional If entered, must be valid email format. |
|
English Helpdesk Phone |
Optional If entered, must be numeric with length > 1 and < =25. |
|
English Helpdesk Phone Extension |
Optional If entered, must be numeric. |
|
French Helpdesk Phone |
Optional If entered, must be numeric with length > 1 and < =25. |
|
French Helpdesk Phone Extension |
Optional If entered, must be numeric. |
|
Country_Subdivision |
Mandatory. |
|
PIN Validation? |
Mandatory. |
|
PIN Link |
Mandatory only if the PIN Validation is Yes. If entered, must be valid URL format (i.e. Must be http or https lowercase with a “://” and may or may not have “www” e.g. http://ccv-cvc-admin.ca or http://www.ccv-cvc-admin.ca or https://ccv-cvc-admin.ca or https://www.ccv-cvc-admin.ca). |
|
Automatic Transfer? |
Mandatory |
|
Secure FTP Transfer Site |
Mandatory only if the Automatic Transfer is Yes. If entered, must be valid FTP format (i.e. Must be ftp, sftp or ftps lowercase with a “://” e.g. ftp:// ftpservername or sftp:// ftpservername or ftps:// ftpservername ). |
|
Transfer Username |
Optional |
|
Transfer Password |
Optional |
|
|
Optional |
|
Transfer Type |
Mandatory only if the Automatic Transfer is Yes. |
Table 3-15 Buttons for CCV Admin - Funding Source / Agency
Details screen
|
Button |
Functionality |
|
Disable |
Only displayed and enabled if Status of
Agency is ‘Enabled’. Saves the data entered on the current page to the database. Changes Status of Agency to ‘Disabled’. Redisplays this screen. |
|
Enable |
Only displayed and enabled if Status of
Agency is ‘Disabled’. Saves the data entered on the current page to the database. Performs the validation rules and if at least one validation fails or if the selected Agency is the ‘CCV’ (based on the system ID), ·
Redisplays this screen with
error message ‘Cannot enable due to validation errors’; Otherwise, If validation rules are successful: ·
Changes Status of Agency to
‘Enabled’ and saves change to database; ·
Redisplays this screen. |
|
Done |
If the Agency’s Status = ‘Enabled’, performs the validation rules, and if at least one validation fails, · Changes Status of Agency to ‘Disabled’; Saves the data entered on the current page to the database. Returns to and displays the CCV Admin – Funding Source - Agency – Agencies Page with the data refreshed. |
|
Undo |
Disabled upon first entry to the screen and
whenever a save is posted to the database. Enabled as soon as any changes are made to
the fields on this screen. When selected, it undoes any changes made to the fields on the current screen since the last database save, disables the Undo button; and redisplays this screen. |
|
Test Secure FTP Link |
When selected: ·
Performs the business rule validation and if it fails, displays error
message(s) upon the screen; ·
Otherwise, if the validation is successful, Triggers a
utility to test the transfer link connectivity using the entered Transfer
Link Server/IP, Transfer Username, Transfer Password and Redisplays this screen with message showing returned transfer link connectivity test results. |
|
Find |
Opens the Search and Select Page to allow the
user to search for and select the Country and Subdivision for their agency. |
|
? |
Displays help for the selected entry. |
If a SuperAdmin user selects the Programs sub-menu item intending to add, edit or delete a program, this screen is displayed. Only those programs that are enabled will be displayed in the Funding Source drop-downs on the Manage CV screens.
Note: an agency cannot be deleted if it is
linked to any submissions.
Figure 3-11 CCV
Admin - Funding
Source / Programs Window
Table 3-16 Fields for CCV Admin - Funding Source /
Programs screen
|
Field |
Validation Rules |
|
Programs |
Sorted alphabetically by Acronym (by English Program Acronym if on English screen, and by French Program Acronym if on French screen). |
|
Acronym |
Display only of English or French Program Acronym depending on language of UI. |
|
Status |
Display only. |
|
Valid From |
Display only. YYYY-MM-DD |
|
Valid To |
Display only. YYYY-MM-DD |
|
Helpdesk Phone |
Display only of English or French Helpdesk Phone Number for Program depending on language of UI. |
|
Helpdesk Email |
Display only of English or French Helpdesk Email for Program depending on language of UI. |
|
PIN Validation? |
Display only of PIN Validation constraint for Program. Value is ‘yes’ or ‘no’. |
|
Agencies |
Display only of acronyms for all agencies associated to the program, comma-separated. |
|
Errors |
Display only of icon in the event of a validation error for the associated grid entry. |
Table 3-17 Buttons for CCV Admin - Funding Source /
Programs screen
|
Button |
Functionality |
|
Add |
Displays the Funding
Source / Program Details page in Add mode. |
|
Edit |
Displays the Funding Source / Program Details page in Edit mode
for the selected Program. |
|
Delete |
Displays a
confirmation screen with ‘Yes’ and ‘No’ options: If ‘No’ is
selected, returns control to the current screen; Otherwise, if
‘Yes’ is selected: ·
Validates if the selected Program is linked to a
submission in the database. If
the selected Program is linked to a submission in the database, it cannot be
deleted; Otherwise,
if the selected Program is not linked to a submission in the database: Ø Deletes the selected Program, its associated
Templates and Admin Users (Program, Template and Helpdesk) from the database;
and Ø Redisplays this screen. |
This screen is used to
add and modify details of a selected program.
The user can select the Enable button to change the status of this
program when it is time to allow it to be displayed in the Funding Source
drop-downs on the Manage CV screens. The Agencies grid at the bottom of the
screen is used to add or delete links for those agencies associated to this
program.
Figure 3-12 CCV
Admin - Funding
Source / Program Details Window
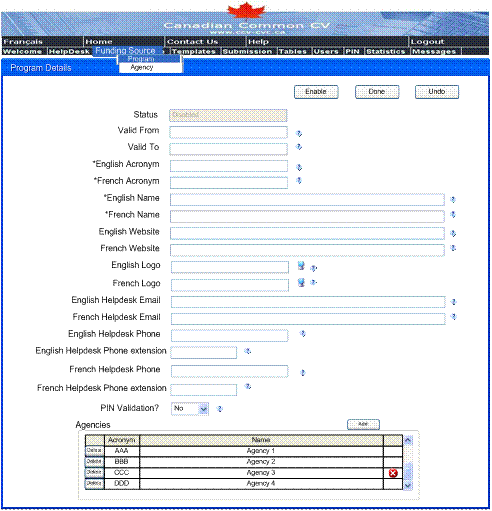
Table 3-18 Fields for CCV Admin - Funding Source / Program
Details screen
|
Field |
Validation Rules |
|
Status |
Display only. If a Program is ‘Disabled’ it will not appear in the drop-downs for Funding Sources on the Template and CV screens. |
|
Valid From |
Mandatory. When text box is selected, calendar date picker opens up. If user selects a date using the date picker, it will populate the text box. User can over-type date in text box. Must be a valid date. |
|
Valid To |
Optional. When text box is selected, calendar date picker opens up. If user selects a date using the date picker, it will populate the text box. User can over-type date in text box. Must be a valid date that is greater than or equal to the Valid From date. |
|
English Acronym |
Mandatory |
|
French Acronym |
Mandatory |
|
English Name |
Mandatory |
|
French Name |
Mandatory |
|
English Website |
Optional If entered, must be valid URL format (i.e. Must be http or https lowercase with a “://” and may or may not have “www” e.g. http://ccv-cvc-admin.ca or http://www.ccv-cvc-admin.ca or https://ccv-cvc-admin.ca or https://www.ccv-cvc-admin.ca). |
|
French Website |
Optional If entered, must be valid URL format (i.e. Must be http or https lowercase with a “://” and may or may not have “www” e.g. http://ccv-cvc-admin.ca or http://www.ccv-cvc-admin.ca or https://ccv-cvc-admin.ca or https://www.ccv-cvc-admin.ca). |
|
English Logo |
Optional User may click file browser icon to select a file. Text box will be filled with selected file name. Logo in file will be stored as a Blob. Logo file size must be less than 25 K; otherwise display error message 21. Logo file extension must be gif, png, jpg or jpeg. Once loaded, logo will be displayed. |
|
French Logo |
Optional User may click file browser icon to select a file. Text box will be filled with selected file name. Logo in file will be stored as a Blob. Logo file size must be less than 25 K; otherwise display error message 21. Logo file extension must be gif, png, jpg or jpeg. Once loaded, logo will be displayed. |
|
English Helpdesk Email |
Optional If entered, must be valid email format. |
|
French Helpdesk Email |
Optional If entered, must be valid email format. |
|
English Helpdesk Phone |
Optional If entered, must be numeric with length > 1 and < =25. |
|
English Helpdesk Phone Extension |
Optional If entered, must be numeric. |
|
French Helpdesk Phone |
Optional If entered, must be numeric with length > 1 and < =25. |
|
French Helpdesk Phone Extension |
Optional If entered, must be numeric. |
|
PIN Validation? |
When PIN Validation = Yes, it indicates that when a researcher submits a Funding CV to this program, the PINs must be validated for each and every agency that is associated to the program and requires PIN validation. When PIN Validation = No, it indicates that even if there is an agency associated to the program that normally requires PIN validation, there is no PIN validation required when a researcher submits a Funding CV to this program. |
|
Agencies |
Display of all Agencies associated to Program. All agencies in the grid must be unique. A Program must contain at least 2 Agencies. Sorted alphabetically by Acronym (by English Agency Acronym if on English screen, and by French Agency Acronym if on French screen). |
|
Acronym |
Display only of Agency Acronym (English or French depending on language of UI). |
|
Name |
Display only of Agency Name (English or French depending on language of UI). |
|
Errors |
Display only of icon in the event of a validation error for the associated grid entry. |
Table 3-19 Buttons for CCV Admin - Funding Source /
Program Details screen
|
Button |
Functionality |
|
Disable |
Only displayed and enabled if Status of
Program is ‘Enabled’. Saves the data entered on the current page to the database. Changes Status of Program to ‘Disabled’
and saves change to database. Redisplays this screen. |
|
Enable |
Only displayed and enabled if Status of
Program is ‘Disabled’. Saves the data entered on the current page to the database. Performs the validation rules and if at least one validation fails, ·
Redisplays this screen with
error message ‘Cannot enable due to validation errors’; Otherwise, If validation rules are successful: ·
Changes Status of Program to
‘Enabled’ and saves change to database; ·
Redisplays this screen. |
|
Add button associated with Agencies grid, if
one exists |
If the Program’s Status = ‘Enabled’, performs the validation rules and if at least one validation fails, · Changes Status of Program to ‘Disabled’; Saves the data entered on the current page to the database. Displays the Add Agency to Program List page. |
|
Delete icon associated with each entry in the
Agencies grid |
Enabled Displays confirmation screen with ‘Yes’ and ‘No’ options: If No is selected: Redisplays
the current screen. If Yes is selected: · Deletes the link between the program and the selected agency; · Saves the data entered on the current page to the database: If the screen was opened in Add mode, the new value will be saved as a new entry for the Programs grid that had been displayed on the CCV Admin – Funding Source - Program – Programs Page; otherwise, it was opened in Edit mode and the changes will be applied to the selected Program and saved to the database; · If the Program’s Status = ‘Enabled’, performs the validation rules, as per details contained in Section 3.4.2 Data / Object Layer in this document: If at least one validation fails, changes Status of Program to ‘Disabled’; · Performs Action_DisplayPage of the current screen. |
|
Done |
If the Program’s Status = ‘Enabled’, performs the validation rules and if at least one validation fails, · Changes Status of Program to ‘Disabled’; Saves the data entered on the current page to the database. Returns to and displays the CCV Admin – Funding Source - Program – Programs Page with the data refreshed. |
|
Undo |
Disabled upon first entry to the screen and
whenever a save is posted to the database. Enabled as soon as any changes are made to
the fields on this screen. When selected, it undoes any changes made to the fields on the current screen since the last database save, disables the Undo button; and redisplays this screen. |
|
? |
Displays help for the selected entry. |
This screen is used to
add an association between an agency and the displayed program.
Figure 3-13 CCV
Admin - Funding
Source / Add Agency to Program List Window

Table 3-20 Fields for CCV Admin - Funding Source / Add
Agency to Program List screen
|
Field |
Validation Rules |
|
Program Name |
Display only of Acronym of Program defined on Program Details page (invisible boundaries) |
|
Select Agency to add to Program |
Mandatory A list of all ‘Active’ Agency acronyms, (with the exception of those that are already associated to the Program), in alphabetic order. |
Table 3-21 Buttons for CCV Admin - Funding Source / Add
Agency to Program List screen
|
Button |
Functionality |
|
Done |
If the Program’s Status = ‘Enabled’, performs the validation rules, and if at least one validation fails: · Changes Status of Program to ‘Disabled’; Saves the data entered on the current page to the database. Returns to and displays the CCV Admin – Funding Source - Program
Details Page with the data refreshed. |
|
Cancel |
Displays the Funding Source / Program Details page. |
|
? |
Displays help for the selected entry. |
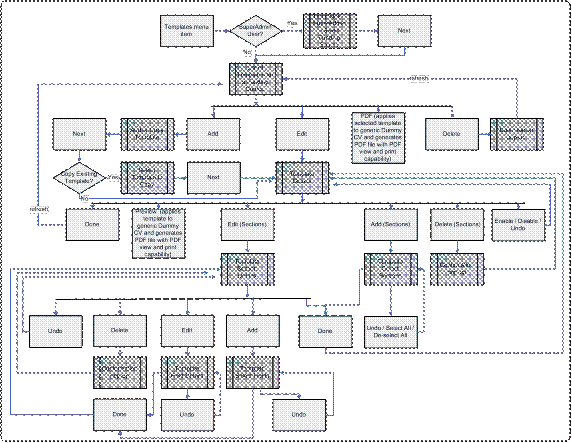
The Templates menu item is selected by a SuperAdmin or an Agency, Program or Template admin user who wishes to view, add, modify or delete a template for a funding source.
The figure below illustrates the window navigation flow through the CCV Administration Tool – Templates menu item.
Figure 3-14
Navigation Flow of CCV Admin Tool – Templates menu item
This window is
displayed when a SuperAdmin user selects the Templates menu item. It allows the SuperAdmin user to select the
funding source for the template they wish to view, add, modify or delete before
selecting the Next button to navigate to the List of Templates for a Funding
Source page. All other types of users (Agency, Program and Template Admins) will,
upon selecting the Templates menu item, go directly to the List of Templates
for a Funding Source page, with their associated funding source selected for
them by the application.
Figure 3-15 CCV
Admin - Templates - SuperAdmin - Select Funding Source Window
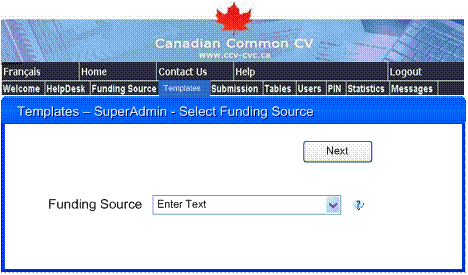
Table 3-22 Fields for CCV Admin - Templates - SuperAdmin -
Select Funding Source screen
|
Field |
Validation Rules |
|
Funding Source |
Mandatory. Displays list of all Funding Source Acronyms (English Acronym if display is in English; otherwise displays French Acronym). |
Table 3-23 Buttons for CCV Admin - Templates - SuperAdmin
- Select Funding Source screen
|
Button |
Functionality |
|
Next |
Displays the CCV Admin – Templates - List
of Templates for a Funding Source page for the selected Funding Source. |
|
? |
Displays help for the selected entry. |
This screen displays a
grid containing a list of all templates associated to the displayed funding
source. On this window, the user may add, edit or delete a template for that
funding source.
Note: a template
cannot be deleted if any CV’s were submitted against it.
Figure 3-16 CCV
Admin – Templates - List of Templates for a Funding Source Window
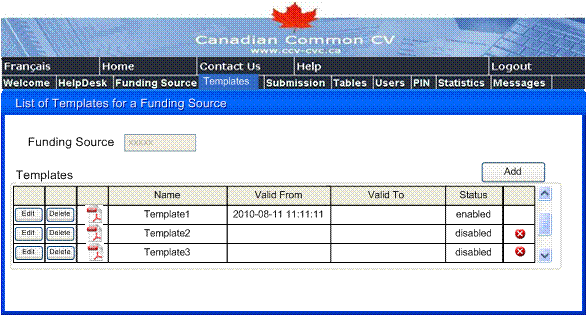
Table 3-24 Fields for CCV Admin – Templates - List of
Templates for a Funding Source screen
|
Field |
Validation Rules |
|
Funding Source |
Display only of the Funding Source Name (English Name if display is in English; otherwise displays French Name) that: · Is associated to a non-SuperAdmin user; or · Was selected by a SuperAdmin user on the CCV Admin - Templates - SuperAdmin - Select Funding Source Window. |
|
Templates |
Lists all Template Names (English or French depending on language of UI) that are associated to the Funding Source. |
|
Name |
If display of screen is currently English, displays the English Template Name; Otherwise, displays French Template Name. |
|
Valid From |
Displays the Template Valid From Date-Time |
|
Valid To |
Displays the Template Valid To Date-Time |
|
Status |
Displays the Template Status |
|
Errors |
Display only of icon in the event of a validation error for the associated grid entry. |
Table 3-25 Buttons for CCV Admin – Templates - List of
Templates for a Funding Source screen
|
Button |
Functionality |
|
Add |
Displays the CCV Admin – Templates - Add or
Copy Template page. |
|
Edit icon in Templates grid |
Displays the CCV Admin – Template Details page
in Edit mode for the selected Template. |
|
Delete icon in Templates grid |
Displays confirmation screen with ‘Yes’ and ‘No’ options: If No is selected: Redisplays the current screen. If Yes is selected: Performs validation to ensure that the Template selected does not have any CV’s submitted against it and, if no CV’s have been submitted against the selected Template: · Deletes the selected Template; · Saves changes to database; and · Redisplays the current screen. |
|
PDF icon in Templates grid |
Selecting the PDF icon for a Template
will apply the associated Template to the Generic CV of a Dummy researcher
entry and generate a PDF file as per the current template using the standard
PDF layout, with view or print capability. |
|
? |
Displays help for the selected entry. |
If a user is adding a
new template, this screen is displayed to allow them the option of using an
existing template as the base structure (by selecting Copy Existing Template) or
of defining the structure themselves (by selecting Add Blank Template).
Figure 3-17 CCV
Admin – Templates - Add or Copy Template Window
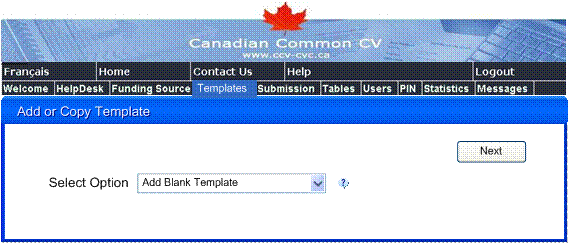
Table 3-26 Fields for CCV Admin – Templates - Add or Copy
Template screen
|
Field |
Validation Rules |
|
Select Option |
Mandatory |
Table 3-27 Buttons for CCV Admin – Templates - Add or Copy
Template screen
|
Button |
Functionality |
|
Next |
Displays: · The CCV Admin – Templates – Template Details page in Add mode (if Add Blank Template option was selected); or ·
The Select Template to Copy
page (if Copy Existing Template option was selected). |
|
? |
Displays help for the selected entry. |
This screen is
displayed if, when adding a new template to a funding source, the user had
selected Copy Existing Template. This
screen displays a grid containing a listing of all of that funding source’s
templates as well as all generic (i.e. where funding source = ‘CCV’) templates
and allows the user to select which one will be used as a base structure for
the new template.
Figure 3-18 CCV
Admin – Templates - Select Template to Copy Window
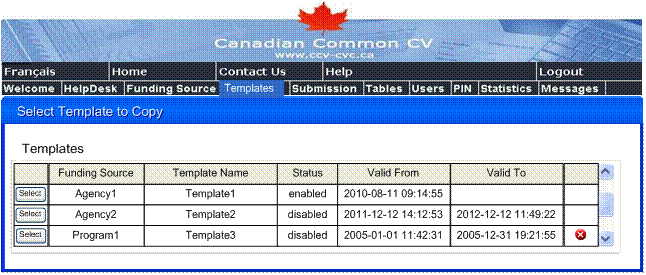
Table 3-28 Fields for CCV Admin – Templates - Select
Template to Copy screen
|
Field |
Validation Rules |
|
Templates |
Lists all Templates that are associated to the Funding Source. For a SuperAdmin, lists all Templates. For a non-SuperAdmin (e.g. Agency Administrator, etc.), lists all Templates associated to the user’s Funding Source, as well as names for all ‘active’ Generic Templates. |
|
Funding Source |
Displays the English or French Acronym for the associated Funding Source depending on the language of the UI. |
|
Template Name |
If display of screen is currently English, displays the English Template Name; Otherwise, displays French Template Name. |
|
Valid From |
Displays the Template Valid From Date-Time |
|
Valid To |
Displays the Template Valid To Date-Time |
|
Status |
Displays the Template Status |
|
Errors |
Display only of icon in the event of a validation error for the associated grid entry. |
Table 3-29 Buttons for CCV Admin – Templates - Select
Template to Copy screen
|
Activity ID |
Action / Command Button |
Task Steps |
|
Action_DisplayPage |
Page is loaded. |
Displays the CCV Admin – Templates - Select Template to Copy page to allow
the user to select an existing template, from a grid listing all templates
for which the user has access, to be used as a base for creating the new
template. |
|
Action_Select |
Select icon |
Enabled Performs validation rules and if there are any validation failures: · Redisplays the current page to display the validation errors; Otherwise, if there are no validation
errors: ·
Saves new template to the
database; and ·
Displays the CCV Admin –
Templates – Template Details page in Add from Copy mode using the selected
Template as a base upon which to build the new template. |
|
Action_? |
? |
Displays help for the selected entry. |
This screen is used to
display, add or modify the details and structure of a template. The user may
press the Add button for the Sections included in the Template grid to add or
remove sections from the template. The user can press the Edit button for a
specific section to select those fields to be added to the template or add any
constraints to the selected section (e.g. such as to make it mandatory or to set
a minimum or maximum number of entries for a multiple-type section that can be
selected on a CV when submitting to this CV Type). Pressing the delete button
will remove the selected section from the template as well as deleting any
saved constraints for that section.
Note: only those
templates that are ‘active’ (i.e. enabled and where the current date is between
the valid from and valid to dates) will be displayed in the CV Type drop-downs
on the manage CV screens.
Figure 3-19 CCV
Admin – Template Details Window
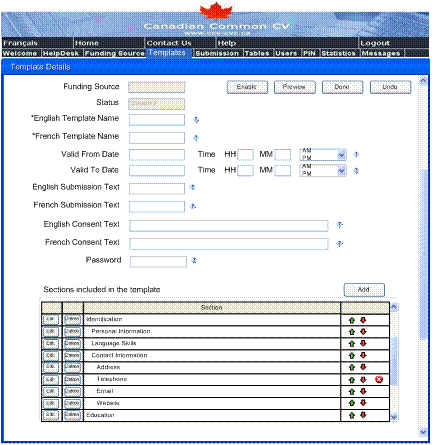
Table 3-30 Fields for CCV Admin – Template Details screen
|
Field |
Validation Rules |
|
Funding Source |
Display only of: · Funding Source selected by SuperAdmin user on Templates – SuperAdmin – Select Funding Source page (refer to Section 3.1 of this document); or · Funding Source associated to non-SuperAdmin user. |
|
Status |
Display only of Status of Template. |
|
English Template Name |
Mandatory. Duplicate template names will be allowed with no validation to prevent more than one from being enabled at one time. It will be the responsibility of the Admin user to ensure that templates with the same name are not enabled at the same time. |
|
French Template Name |
Mandatory. Duplicate template names will be allowed with no validation to prevent more than one from being enabled at one time. It will be the responsibility of the Admin user to ensure that templates with the same name are not enabled at the same time. |
|
Valid From |
A Template’s Valid From and Valid To dates must be within the related Funding Source’s Valid From and Valid To dates. |
|
Valid From Date |
When text box is touched, calendar date picker opens up. If user selects a date using the date picker, it will populate the text box. User can over-type date in text box. Mandatory: If no date selected, set Valid From Date to current date. Date must be valid. |
|
Valid From Time |
If no time entered, set Valid From Time to 00:00 a.m. Time must be valid. |
|
Valid To |
Optional A Template’s Valid From and Valid To dates must be within the related Funding Source’s Valid From and Valid To dates. Note: a Valid To Date/Time that is null is interpreted to be infinity. |
|
Valid To Date |
Optional. When text box is touched, calendar date picker opens up. If user selects a date using the date picker, it will populate the text box. User can over-type date in text box. If entered, must be valid. If both Valid To Date and Valid From Date are entered, the Valid
To Date must be greater than or equal to the Valid From Date. |
|
Valid To Time |
Optional If entered, must be valid. If empty, but Valid To Date was entered,
sets Valid To Time to 11:59 p.m. |
|
English Submission Text |
If contains data, this text will be displayed after researcher consents to submit his/her CV to the Funding Source. |
|
French Submission Text |
If contains data, this text will be displayed after researcher consents to submit his/her CV to the Funding Source. |
|
English Consent Text |
If entered, this text will be appended after the generic static consent text that is displayed when a user submits a CV. |
|
French Consent Text |
If entered, this text will be appended after the generic static consent text that is displayed when a user submits a CV. |
|
Password |
If entered, this password will be required when a researcher attempts to create a Funding CV for this template; Otherwise if left empty, no password is required to create a Funding CV for this template. |
|
Sections included in the Template |
Lists all Dataset Sections for this Template that have Include in Template = Yes, in a tree structure, – indented to show hierarchy - in sequential order. Note: For creation of a new blank template, the initial default value for the Include in Template for its Sections is ‘No’. In Edit or Add from Copy mode, the Include in Template value for its Sections and Fields will be set as per the values for the Template being edited or copied. At least one section must be included for a Template to be enabled. If a Section or Field is enabled in Dataset and has Mandatory indicator = ‘yes’, it must be included in the template and have mandatory indicator = ‘yes’. If a Section or Field is disabled in Dataset, it should not be included in Template. |
|
Section |
If display of screen is currently English, displays English Section Name; Otherwise, displays French Section Name. |
|
Ordering and Errors |
Ordering icons: When the Move Up icon or Move Down icon is selected, will decrease/increase the sequence number of the selected section within the parent section and change the sequence numbers of the other sections for that parent to reflect the new order. The page will refresh and reposition the selected entry within the table to reflect the requested move. If user cannot move a section within a parent section if there is no room for it to move in that direction. Error icons: If the associated grid entry has a validation error, this column will contain an error icon. |
Table 3-31 Buttons for CCV Admin – Template Details screen
|
Button |
Functionality |
|
Add button for the Sections included in the
template grid |
If the Template’s Status = ‘Enabled’, performs the validation rules, and iff at least one validation fails: · Changes Status of Template to ‘Disabled’; Saves the data entered on the current page to the database. Displays the CCV
Admin – Template – Select Sections page. |
|
Edit button for each entry of the Sections
included in the template grid |
If the Template’s Status = ‘Enabled’, performs the validation rules, and if at least one validation fails: · Changes Status of Template to ‘Disabled’; Saves the data entered on the current page to the database. Displays the CCV
Admin – Template Section Details page in Edit mode for the selected Section. |
|
Delete button for each entry of the Sections
included in the template grid |
Displays confirmation message with ‘Yes’ and ‘No’ options’: · If yes is pressed: Validates that there are no submissions associated to the template and if there are no submissions associated to the template: Deletes the selected Template Section and all of its children from the database; Saves the data entered on the current page: the changes will be applied to the selected Template and saved to the database; and Refreshes display of current screen; ·
If no is pressed: Returns control to the current page. |
|
Preview |
If the Template’s Status = ‘Enabled’, performs the validation rules, and if at least one validation fails: · Changes Status of Template to ‘Disabled’; Saves the data entered on the current page to the database. Selecting the Preview action will apply the associated Template to
the Generic CV of a Dummy researcher entry and generate a PDF file as per the
current template using the standard PDF layout, with view or print
capability. |
|
Done |
Saves the data entered on the current page to the database. If the Template’s Status = ‘Enabled’: Performs the validation rules and if at least one validation fails: · Sets the Template’s Status to ‘Disabled’; · Saves change to database; Returns to and displays the CCV Admin – Templates – List of Templates for a Funding Source page with the data refreshed. |
|
Disable |
Only displayed and enabled if Status of
Template is ‘Enabled’. Saves the data entered on the current page to the database. Changes Status of Template to ‘Disabled’
and saves change to database. Redisplays this screen. |
|
Enable |
Only displayed and enabled if Status of
Template is ‘Disabled’. Saves the data entered on the current page to the database. Performs the validation rules and if at least one validation fails: ·
Redisplays this screen with message
‘Cannot enable due to validation errors’; Otherwise, If validation rules are successful: ·
Changes Status of Template to
‘Enabled’ and saves change to database; ·
Redisplays this screen. |
|
Undo |
Disabled upon first entry to the screen and
whenever a save is posted to the database. Enabled as soon as any changes are made to
the fields on this screen. When selected, it undoes any changes made to the fields on the current screen since the last database save, disables the Undo button; and redisplays this screen. |
|
? |
Displays help for the selected entry. |
This screen is
displayed when the Add button is pressed for the Sections included in the
Templates grid on the Template Details screen. It allows the user to select all
those sections that should be included in the template and deselect any that
should not.
Figure 3-20 CCV
Admin – Template - Select Sections Window
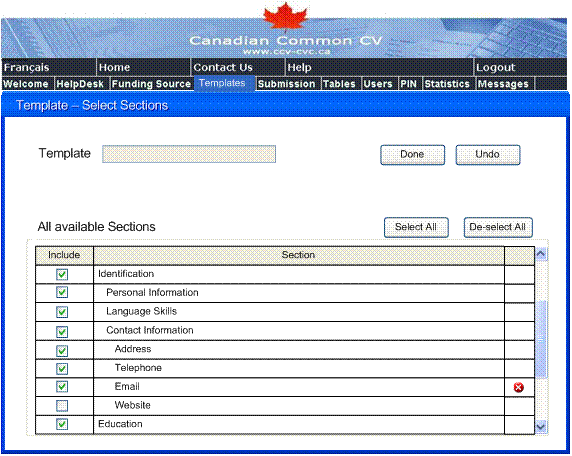
Table 3-32 Fields for CCV Admin – Template - Select
Sections screen
|
Field |
Validation Rules |
|
View: Template - Select Sections English Window Title: Template - Select
Sections |
|
|
Template |
Display only of name of template being updated. |
|
All available Sections |
Lists all Dataset Sections with status ‘enabled’ from the database, in a tree structure, indented to show hierarchy - in sequential order. Note: for creation of a new template, the initial default value for the Include in Template for its Sections is No. |
|
Include |
Enabled Note: on creation of a new template, the initial default value for the Include in Template for its Sections is Unselected. Set Section’s Include in Template to: On for any entries with check box selected; Off for any entries with check box de-selected. Note: When a Section’s Include check box is deselected: Its children (sub-sections and fields) are all automatically de-selected. When a Section’s Include check box is set to selected: All Include check boxes for its fields are automatically set to selected. |
|
Section |
If display of screen is currently English, displays English Section Name; Otherwise, displays French Section Name. |
|
Errors |
Always disabled. If the associated grid entry has a validation error, this column will contain an error icon. |
Table 3-33 Buttons for CCV Admin – Template - Select
Sections screen
|
Button |
Functionality |
|
Done |
When a Section’s
Include check box has been changed from selected to deselected: Ø
Its children (sub-sections and fields) are all automatically
de-selected. When a Section’s
Include check box has been changed from deselected to selected: Ø
All of its fields are automatically selected. If the Template’s
Status = ‘Enabled’: Performs
the validation rules and if at least one validation fails: ·
Sets the Template’s Status to ‘Disabled’; Saves the data
entered on the current page to the database; Returns to and displays
the CCV Admin – Templates –Template Details Page with the data refreshed. |
|
Undo |
Disabled upon first entry to the screen and
whenever a save is posted to the database. Enabled as soon as any changes are made to
the fields on this screen. When selected, it undoes any changes made to
the fields on the current screen since the last database save, disables the
Undo button; and redisplays this screen. |
|
Select All |
Sets all Include check boxes in the All available Sections grid to ‘Selected’. |
|
De-select All |
Sets all Include check boxes in the All
available Sections grid to ‘Unselected’. |
This screen is
displayed when the user selected the Edit button for a grid entry on the
Template Details screen. It allows the user to set minimum and maximum #
entries constraints for a multiple-type of section as well as allowing the user
to select or deselect those fields that should be included in the template.
Selecting the Edit button for an entry in the grid allows the user to set
constraints for the selected field.
Figure 3-21 CCV
Admin – Template Section Details Window
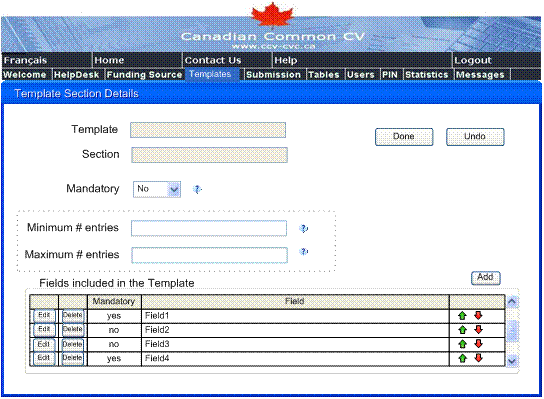
Table 3-34 Fields for CCV Admin – Template Section Details
screen
|
Field |
Validation Rules |
|
Template |
Display only of Template English Name or French Name from Template Details page. |
|
Section |
Display only of Section English Name or French Name for Section selected for Edit on Template Details page. |
|
Mandatory |
Mandatory If a Section is defined with Mandatory = Yes in the Dataset, the Mandatory setting for the Section in the Template cannot be set to No, so the only option in the drop-down list will be ‘yes’. On the other hand, if a Section is defined with Mandatory = No in the Dataset, a user can set it to have Mandatory = Yes for the Template. |
|
Minimum # entries |
Optional Only displayed for a Section that has Type = Multiple Must be numeric |
|
Maximum # entries |
Optional Only displayed for a Section that has Type = Multiple Must be numeric If both Minimum # Entries and Maximum # Entries are entered, Maximum # Entries must be >= Minimum # Entries |
|
Fields included in the Template |
Lists all Dataset Fields for this Section in the Template that have Include in Template = On. Note: for creation of a new template, the initial default value for the Include in Template for its Sections and Fields is No. |
|
Mandatory |
Display only of Mandatory setting for Field. |
|
Field |
If display of screen is currently English, displays English Field Name; Otherwise, displays French Field Name. |
|
Ordering and Errors |
Ordering icons: When the Move Up icon or Move Down icon is selected, will decrease/increase the sequence number of the selected Field within the parent section and change the sequence numbers of the other fields for that parent to reflect the new order. The page will refresh and reposition the selected entry within the table to reflect the requested move. User cannot move a field within a parent section if there is no room for it to move in that direction. Error icons: If the associated grid entry has a validation error, this column will contain an error icon. |
Table 3-35 Buttons for CCV Admin – Template Section
Details screen
|
Button |
Functionality |
|
Add |
If the Template’s Status = ‘Enabled’: Performs the validation rules and if at least one validation fails: · Sets the Template’s Status to ‘Disabled’; Saves the data entered on the current page to the database. Displays the CCV Admin – Template – Select
Fields page. |
|
Edit |
If the Template’s Status = ‘Enabled’: Performs the validation rules and if at least one validation fails: · Sets the Template’s Status to ‘Disabled’; Saves the data entered on the current page to the database. Displays the CCV Admin – Template – Select
Fields page in Edit mode. |
|
Delete |
Displays confirmation message with ‘Yes’ and ‘No’ options: · If yes is pressed: Validates that there are no submissions associated to the template and, if there are no submissions associated to the template: Deletes the selected Template Field from the Template Section in the database; Saves the data entered on the current page to the database; and Refreshes display of current screen; ·
If no is pressed: Returns control to the current page. |
|
Done |
This screen can only be opened in Edit mode: If the Template’s Status = ‘Enabled’: Performs the validation rules and if at least one validation fails: Ø
Sets the
Template’s Status to ‘Disabled’; Saves the data entered on the current page to the database; and Returns to and displays the CCV Admin –
Templates – Template Details page with the data refreshed. |
|
Undo |
Disabled upon first entry to the screen and
whenever a save is posted to the database. Enabled as soon as any changes are made to
the fields on this screen. When selected, it undoes any changes made to the fields on the current screen since the last database save, disables the Undo button; and redisplays this screen. |
|
? |
Displays help for the selected entry. |
This screen allows the
user to select those fields to be included in the template and deselect those
that should not.
Figure 3-22 CCV
Admin – Template - Select Fields Window
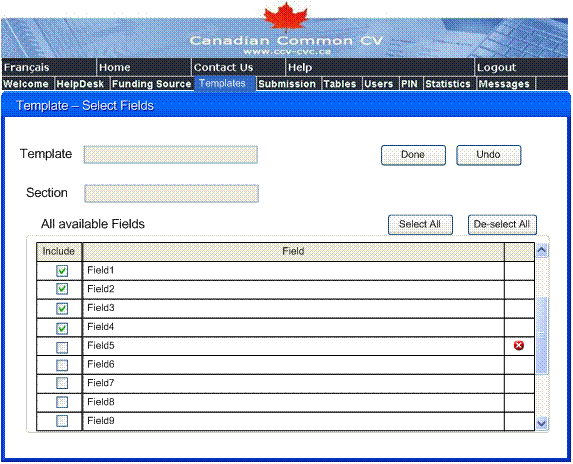
Table 3-36 Fields for CCV Admin – Template - Select Fields
screen
|
Field |
Validation Rules |
|
Template |
Display only of Template English Name or French Name from Template Details page. |
|
Section |
Display only of Section English Name or French Name from Template Section Details page. . |
|
All available Fields |
Lists all Dataset Fields with status ‘enabled’ for the selected Section from the database. Note: for creation of a new template, the initial default value for the Include in Template for its Sections and Fields is No. When a Section is set to Selected, its fields are automatically set to Selected. |
|
Include |
Note: on creation of a new template, the initial default value for the Include in Template for its Sections is Unselected. When a Section is set to Selected, all of its Fields will also have Include check box set to Selected. If a field in a section is dependent on another field in the section, then the dependency field must have the Include attribute = ‘Yes’ if the Include attribute is ‘Yes’ for the dependent field Set Field’s Include in Template to: On for any entries with Include check box selected; Off for any entries with Include check box de-selected. |
|
Field |
If display of screen is currently English, displays English Field Name; Otherwise, displays French Field Name. |
|
Errors |
Always disabled. If the associated grid entry has a validation error, this column will contain an error icon. |
Table 3-37 Buttons for CCV Admin – Template - Select
Fields screen
|
Button |
Functionality |
|
Done |
Set Fields’ Include
in Template to: · On for any entries with Include check box selected; · Off for any entries with Include check box de-selected. If the Template’s
Status = ‘Enabled’: · Performs the validation rules and if at least one validation fails: Ø
Sets the
Template’s Status to ‘Disabled’; Saves the data
entered on the current page to the database; Returns to and
displays the CCV Admin – Templates –Template Section Details Page with the
data refreshed. |
|
Undo |
Disabled upon first entry to the screen and
whenever a save is posted to the database. Enabled as soon as any changes are made to
the fields on this screen. When selected, it undoes any changes made to the fields on the current screen since the last database save, disables the Undo button; and redisplays this screen. |
|
Select All |
Sets all Include check boxes in the All
available Fields grid to ‘Selected’. |
|
De-select All |
Sets all Include check boxes in the All
available Fields grid to ‘Unselected’. |
This screen allows the
user to set constraints that are dependent on the type of field being
displayed. (e.g. for a date field, the user could set a From Date and To Date
constraint, or a Years Back constraint).
Figure 3-23 CCV
Admin – Template Field Details Window
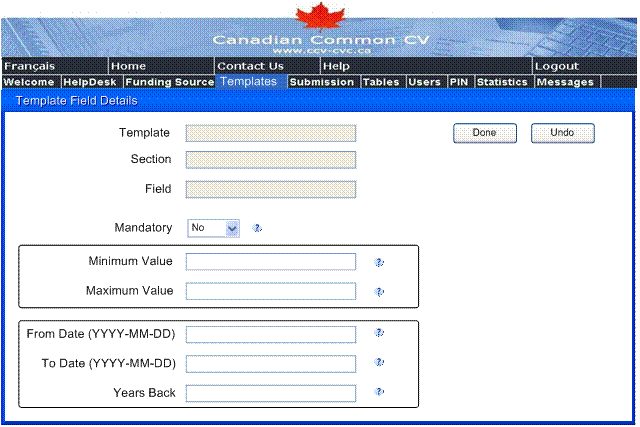
Table 3-38 Fields for CCV Admin – Template Field Details
screen
|
Field |
Validation Rules |
|
Template |
Display only of Template English Name or French Name from Template Details page. |
|
Section |
Display only of Section English Name or French Name for Section selected for Edit on Template Details page. |
|
Field |
Display only of Field English Name or French Name for Field selected for Edit on Template Section Details page. |
|
Mandatory |
Enabled If a Field is defined with Mandatory = Yes in the Dataset, the Mandatory setting for the Field in the Template cannot be set to No, so the only value in this drop-down list will be ‘Yes’. On the other hand, if a Field is defined with Mandatory = No in the Dataset, a user can set it to have Mandatory = Yes for the Template. |
|
Minimum Value |
Only displayed and enabled for a Field that has Type = Number Optional If entered, must be numeric. |
|
Maximum Value |
Only displayed and enabled for a Field that has Type = Number Optional If entered, must be numeric. If both Minimum Value and Maximum Value are entered, Maximum Value must be >= Minimum Value |
|
From Date |
Optional Only displayed and enabled for a Field that has Type = Date; YYYY-MM-DD When text box is touched, calendar date picker opens up. If user selects a date using the date picker, it will populate the text box. User can over-type date in text box. Must be a valid date. |
|
To Date |
Optional Only displayed and enabled for a Field that has Type = Date; YYYY-MM-DD When text box is touched, calendar date picker opens up. If user selects a date using the date picker, it will populate the text box. User can over-type date in text box. Must be a valid date. If both To Date and From Date are entered, the To Date must be greater than or equal to the From Date |
|
Years Back |
Optional Only displayed and enabled for a Field that has Type = Date; Must be numeric. If there is a value for Years Back, Valid from Date and Valid To Date must be blank. |
Table 3-39 Buttons for CCV Admin – Template Field Details
screen
|
Button |
Functionality |
|
Done |
This
screen can only be accessed in Edit mode: If
the Template’s Status = ‘Enabled’: Performs
the validation rules and if at least one validation fails: Ø
Sets the Template’s Status to ‘Disabled’; Saves
the data entered on the current page for the selected Template to the
database. Returns
to and displays the CCV Admin – Templates – Template Section Details page
with the data refreshed. |
|
Undo |
Disabled upon first entry to the screen and
whenever a save is posted to the database. Enabled as soon as any changes are made to
the fields on this screen. When selected, it undoes any changes made to the fields on the current screen since the last database save, disables the Undo button; and redisplays this screen. |
|
? |
Displays help for the selected entry. |
This menu item is only accessible by Agency and Program Admins, SuperAdmins and CV Reviewers. It may be used to search for, list, view, download and transfer CV’s that were already submitted.
Figure 3-24
Navigation Flow of CCV Admin Tool – Submissions menu item
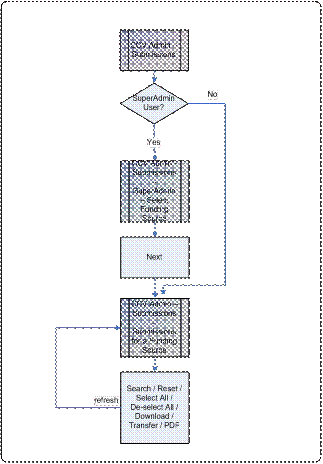
Figure 3-25 Flow
of a Submission through all of its Transmission States
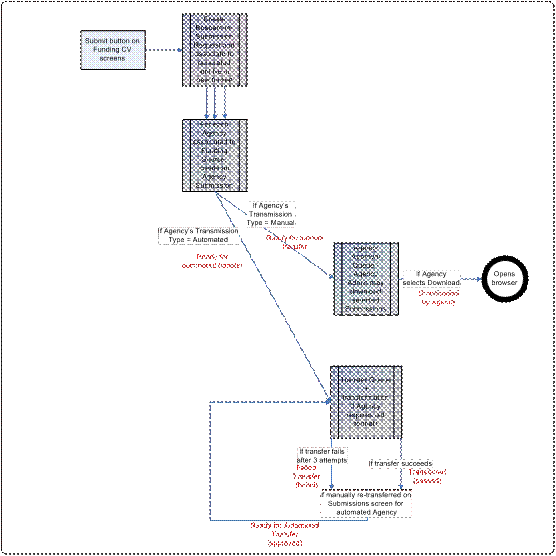
This window is
displayed when a SuperAdmin user selects the Submissions menu item. It allows the SuperAdmin user to select the
funding source for the Submissions they wish to view before selecting the Next
button to navigate to the Submissions for a Funding Source page. All other
types of users (Agency, Programs and CV Reviewer) will, upon selecting the
Submissions menu item, go directly to the Submissions for a Funding Source
page, with their associated funding source selected for them by the
application.
Figure 3-26 CCV Admin - Submissions -
SuperAdmin - Select Funding Source Window
Table 3-40
Fields for CCV Admin - Submissions - SuperAdmin - Select Funding Source screen
|
Field |
Validation Rules |
|
Funding Source |
Mandatory. Displays list of all Funding Source Acronyms (English Acronym if display is in English; otherwise displays French Acronym). |
Table 3-41
Buttons for CCV Admin - Submissions - SuperAdmin - Select Funding Source screen
|
Button |
Functionality |
|
Next |
Displays the CCV Admin – Submissions - Submissions
for a Funding Source page for the selected Funding Source. |
|
? |
Displays help for the selected entry. |
This screen will, upon
pressing the Search button, populate a grid containing a listing of all CV’s
submitted to the displayed funding source that satisfy the entered search
criteria and the constraints of the admin user’s role. Buttons will be hidden
or displayed depending upon the role of the admin user.
Note: if the search
returns over 200 results, only the first 200 will be returned and an error
message requesting them to re-enter their criteria to refine the search.
Figure 3-27 CCV
Admin - Submissions
- Submissions for a Funding Source Window
Table 3-42 Fields for CCV Admin - Submissions -
Submissions for a Funding Source screen
|
Field |
Validation Rules |
|
Funding Source |
Display only of Acronym of Funding Source associated to non-SuperAdmin User or selected by a SuperAdmin User on the CCV Admin - Submissions - SuperAdmin - Select Funding Source window |
|
CV Type |
Lists all of the templates for the Funding Source that is either associated to a non-SuperAdmin User or that was selected by a SuperAdmin User on the CCV Admin - Submissions - SuperAdmin - Select Funding Source window. For a user with the CV Reviewer role, only those templates in the grid for that userid will be displayed in the drop-down. If an entry is selected, this search criterion will be used to search for all submissions submitted to the funding source using this template. |
|
First Name |
If any data is entered, this search criterion will be used to search for all submissions where the user’s first name contains this text. |
|
Last Name |
If any data is entered, this search criterion will be used to search for all submissions where the user’s last name contains this text. |
|
From |
If any data is entered, this search criterion will be used to search for all submissions with a submission date/time greater than or equal to the date/time entered. Form Date/Time cannot be greater than the current date/time. If From Date/time and To Date/time are both entered, From Date/time must be <= To Date/time. |
|
To |
If any data is entered, this search criterion will be used to search for all submissions with a submission date/time less than or equal to the date/time entered. If From Date/time and To Date/time are both entered, From Date/time must be <= To Date/time. |
|
Transfer Status |
Only displayed if user does not have role CV Reviewer and Funding Source displayed is an Agency. Lists all of the possible states for a submission. If an entry is selected, this search criterion will be used to search for all submissions submitted to the funding source that have this transfer status. |
|
Submissions |
Hidden until a Search has been performed. Sorted chronologically by submitted date (oldest date displayed first). |
|
Select box |
Only displayed if user does not have role CV Reviewer and Funding Source displayed is an Agency. When the Transfer or Download button is pressed, the action will be performed for each grid entry that has this check box selected. |
|
First Name |
Display only of First Name of user who submitted the Submission. |
|
Family Name |
Display only of Last Name of user who submitted the Submission. |
|
Submitted On |
Display only of Submission’s date and time. |
|
Transfer Status |
Only displayed if user does not have role CV Reviewer and Funding Source displayed is an Agency. Display only of Submission’s current status. |
|
Batch ID |
Only displayed if user does not have role CV Reviewer and Funding Source displayed is an Agency. Display only of Submission’s associated Batch ID. |
|
Errors |
Display only of icon in the event of a validation error for the associated grid entry. |
Table 3-43 Buttons for CCV Admin - Submissions -
Submissions for a Funding Source screen
|
Button |
Functionality |
|
Search button |
Performs the search to populate the search
results (Submissions) grid with all submissions that match the entered search
criteria. For a SuperAdmin who chose an Agency type of
Funding Source: searches all
submissions associated to that agency; For an Agency Admin: searches only those submissions submitted
to that agency; For a CV Reviewer for an Agency: searches only those submissions submitted to
that agency through one of the templates that is in the Templates grid for
their userid. For a Program Admin or a SuperAdmin who chose
a Program type of Funding Source: does not search submissions but instead searches and displays all researcher
submission requests submitted to that program. For a CV Reviewer for a Program: searches only those submission requests submitted to that program through one of the templates that is in the Templates grid for their userid. Note: When the user presses Search, the
result set will be determined; if the search returns over 200 results, only
the first 200 will be returned, along with error message requesting them to
re-enter their criteria to refine the search. |
|
Reset button |
Resets the search criteria fields to their
default values and empties and empties the search results (Submissions) grid. |
|
Select All button |
Only displayed if user does not have role CV Reviewer and Funding Source displayed is an Agency. When selected: Sets every Select box check box for each entry displayed in the grid to ‘selected’. |
|
De-select All button |
Only displayed if user does not have role CV Reviewer and Funding Source displayed is an Agency. When selected: Sets every Select box check box for each entry displayed in the grid to ‘unselected’. |
|
Create PDF icon for
each entry in Submissions grid |
Invokes Adobe’s
Create PDF functionality for the associated submission providing the user
with View and/or Print capability. |
|
Transfer button or Download button |
Only Displayed and Enabled for an Agency Admin or a SuperAdmin who selected an Agency type of Funding Source. Button label will be: ·
‘Transfer’
if Agency has Automatic Transfer = ‘Yes’; and ·
‘Download’
if Agency has Automatic Transfer = ‘No’. When the Transfer button is pressed, ·
Sets the
status of the selected Submissions to ‘Ready for Automated Transfer’; ·
Saves
changes to database; ·
Writes
record to audit table; ·
Redisplays
the current screen. When the Download button is pressed, There are two
separate processes that are occurring: one external browser to allow the user
to download the selected submissions and another process under the control of
the CCV. It must be noted that the
external browser process is asynchronous, that is, the CCV has no knowledge
of this process, nor of its success or failure. Only the CCV process is described below: ·
Sets the
status of the selected Submissions to ‘Downloaded by Agency’; ·
Saves
changes to database; ·
Writes
record to Audit table; ·
Redisplays
the current screen. Note that should
the download be unsuccessful, this will be indicated by the external browser
process. It will then be the admin
user’s responsibility to perform the download once again. |
|
? |
Displays help for the selected entry. |
This menu item will
only be accessible to a SuperAdmin or an Agency Admin. A SuperAdmin will have access to all of its
sub-menu items (LOV, Dataset, Reference and CCV Admin Reports), whereas an
Agency Admin will only have access to the CCV Admin Reports sub-menu item.
The figure below illustrates the window navigation flow through the CCV Administration Tool – Tables menu item – LOV sub-menu item.
Figure 3-28
Navigation Flow of CCV Admin Tool – Tables menu item – LOV sub-menu item

The figure below illustrates the window navigation flow through the CCV Administration Tool – Tables menu item – Dataset sub-menu item.
Figure 3-29 Navigation Flow of CCV Admin Tool – Tables menu item – Dataset sub-menu item
The figure below illustrates the window navigation flow through the CCV Administration Tool – Tables menu item – Reference sub-menu item.
Figure 3-30
Navigation Flow of CCV Admin Tool – Tables menu item – Reference sub-menu item
The SuperAdmin
user has logged in successfully and accessed the CCV Admin application / Table
menu item / LOV sub-menu item for the purposes of:
· Viewing a listing of all LOV Tables;
· Adding or modifying a LOV Table;
· Viewing, adding or modifying a value in a LOV Table.
Figure 3-31 CCV Admin - Tables – LOV – Name Window
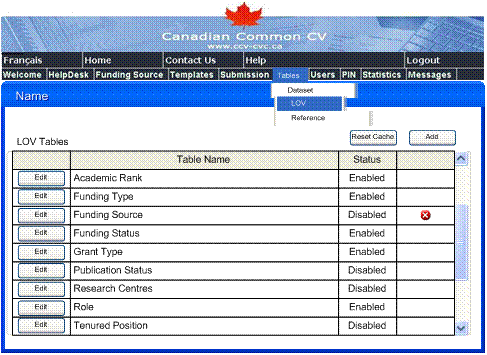
Table 3-44 Fields for CCV Admin - Tables – LOV – Name
screen
|
Field |
Validation Rules |
|
LOV Tables |
Lists Names of all LOV Tables. |
|
Table Name |
Display only of English Table Name if on English screen, French Table Name if on French screen |
|
Status |
Display only of the Status of the LOV table. If the Status of the LOV Table is ‘Enabled’, then it will be displayed in the drop-down list when the LOV Tables are displayed on the Dataset screens. |
|
Errors |
Display only of icon in the event of a validation error for the associated grid entry. |
Table 3-45 Buttons for CCV Admin - Tables – LOV – Name
screen
|
Button |
Functionality |
|
Reset Cache |
Pressing this button empties the cache and then automatically loads all LOV’s into the cache. This will take a couple of minutes to complete and should be performed whenever changes have been made to an LOV that should be made available to everyone. It is recommended to make all required changes to the LOVs at one time and then press the Reset Cache button once to refresh the CCV and CCV Admin applications with all of the changes because this functionality impacts system performance. |
|
Add |
Displays the CCV Admin
– Tables – LOV – List of Value Details page in Add mode. |
|
Edit |
Displays the CCV Admin
– Tables – LOV – List of Value Details page in Edit mode for the selected LOV Table. |
This screen allows the
SuperAdmin user to view, add or change a LOV table name in the top portion of
the screen. The bottom portion of the screen allows the SuperAdmin to view, add
or change the elements (i.e. values) within the LOV table. There is also an
option to filter the display of the elements by performing a partial, wild-card
search of text within an element name (i.e. value). Note: only enabled tables
and values will be displayed in the drop-downs on the Manage CV screens.
Figure 3-32 CCV Admin – Tables – LOV – List of Value Details Window

Table 3-46 Fields for CCV Admin – Tables – LOV – List of
Value Details screen
|
Field |
Validation Rules |
|
Status |
Display only of status of table. An enabled table must have at least 1 enabled value in the LOV Elements list in order to be valid If the Status of the LOV Table is ‘Enabled’, then it will be displayed in the drop-down list when the LOV Tables are displayed on the Dataset screens. |
|
English Table Name |
Mandatory. Must be unique within database. |
|
French Table Name |
Mandatory. Must be unique within database. |
|
English Element Name Filter |
Optional If anything is entered in this text box, it will be used to filter the display of entries in the Elements grid when the Filter button is pressed. |
|
French Element Name Filter |
Optional If anything is entered in this text box, it will be used to filter the display of entries in the Elements grid when the Filter button is pressed. |
|
Elements |
Lists all Elements for the selected LOV Table that satisfy any entered search criteria. |
|
System ID |
Display only of UUID code for LOV element. |
|
Code |
Display only of business code for LOV element. |
|
English Name |
Display only of Element’s English Name. |
|
French Name |
Display only of Element’s French Name. |
|
Status |
Display only of Element’s Status. |
|
Errors |
Display only of icon in the event of a validation error for the associated grid entry. |
Table 3-47 Buttons for CCV Admin – Tables – LOV – List of
Value Details screen
|
Button |
Functionality |
|
Filter |
Only displayed and enabled if screen was entered in Edit mode; will be hidden in Add mode. Performs a wild-card search of elements
in the LOV table to filter the display of elements in the grid to match the
English Element Name and French Element Name criteria if any was entered. |
|
Reset |
Only displayed and enabled if screen was entered in Edit mode; will be hidden in Add mode. Resets the English Element Name and French Element Name search criteria to null and refreshes display of this screen to display all entries of the elements in the LOV Table. |
|
Add |
If the LOV Table’s Status = ‘Enabled’, performs the validation rules, and if at least one validation fails, the status of the LOV Table is set to ‘Disabled’. Any data entered on the current page is saved to the database and the Element Details page is opened in Add mode. |
|
Edit |
If the LOV Table’s Status = ‘Enabled’, performs the validation rules, and if at least one validation fails, the status of the LOV Table is set to ‘Disabled’. Any data entered on the current page is
saved to the database and the Element Details page is opened in Edit mode. |
|
Disable |
Only displayed and enabled if the Status of the
LOV Table is ‘Enabled’. Any data entered on the current page is
saved to the database and the status of the LOV Table is changed to
‘Disabled’ before redisplaying this screen. |
|
Enable |
Only displayed and enabled if the Status of the
LOV Table is ‘Disabled’. Any data entered on the current page is saved to the database. Performs the validation rules and if at least one validation fails, redisplays this screen with message ‘Cannot enable due to validation errors’; Otherwise, if the validation is
successful, changes the Status of the LOV Table to ‘Enabled’, and redisplays
this screen. |
|
Done |
Saves the data entered on the current page to the database. If the Section’s Status = ‘Enabled’, performs the validation rules and if at least one validation fails, sets the LOV Table’s Status to ‘Disabled’. Returns to and displays the CCV Admin – Tables - LOV – Name Page. |
|
Undo |
Disabled upon first entry to the screen and
whenever a save is posted to the database. Enabled as soon as any changes are made to
the fields on this screen. When selected, it undoes any changes made to the fields on the current screen since the last database save, disables the Undo button; and redisplays this screen. |
|
? |
Displays the help for the selected entry. |
This screen allows the
SuperAdmin user to view, add or change element names (i.e. values) within a LOV
table. The user may also view, add or
change the business code for the element. Note: only enabled tables and enabled
elements will be displayed in the drop-downs on the Manage CV screens.
Figure 3-33 CCV Admin – Tables – LOV - Element Details Window
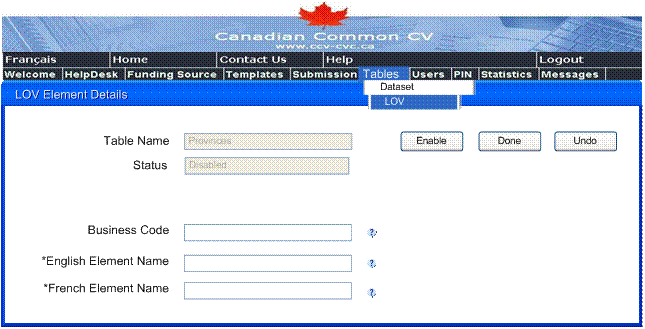
Table 3-48 Fields for CCV Admin – Tables – LOV - Element
Details screen
|
Field |
Validation Rules |
|
Table Name |
Display only of LOV Table name passed from List of Value Details page. |
|
Status |
Display only of Status of Element |
|
Business Code |
Optional |
|
English Element Name |
Mandatory and must be unique within a LOV Table |
|
French Element Name |
Mandatory and must be unique within a LOV Table |
Table 3-49 Buttons for CCV Admin – Tables – LOV - Element
Details screen
|
Button |
Functionality |
|
Disable |
Only displayed and enabled if Status of LOV
Element is ‘Enabled’. Any data entered on the current page is saved to the database and the status of the LOV Element is changed to ‘Disabled’ before redisplaying this screen. |
|
Enable |
Only displayed and enabled if Status of LOV
Element is ‘Disabled’. Any data entered on the current page is saved to the database. Performs the validation rules and if at least one validation fails, redisplays this screen with message ‘Cannot enable due to validation errors’; Otherwise, if the validation is
successful, changes the Status of the LOV Element to ‘Enabled’, and
redisplays this screen. |
|
Done |
Saves the data entered on the current page to the database. If the Section’s Status = ‘Enabled’, performs the validation rules and if at least one validation fails, sets the LOV Element’s Status to ‘Disabled’. Returns to and displays the CCV Admin – Tables - LOV – List of Value Details page. |
|
Undo |
Disabled upon first entry to the screen and
whenever a save is posted to the database. Enabled as soon as any changes are made to
the fields on this screen. When selected, it undoes any changes made to
the fields on the current screen since the last database save, disables the
Undo button; and redisplays this screen. |
|
? |
Displays the help for the selected entry. |
This screen is
displayed when a SuperAdmin user selects the Tables menu item and the Dataset
sub-menu item with the intention of viewing, adding, modifying or deleting a
section, sub-section or field of the Dataset. The SuperAdmin may select the Add
Root Section button to add a major section or select the Add Subsection icon in
the grid to add a section directly beneath the selected section. A section can
only be deleted if it was not yet used in a generic CV or a Template. The
Publish Reports button calls the report service to automatically publish the CCV
reports.
Figure 3-34 CCV
Admin - Tables – Dataset – Dataset Sections Window
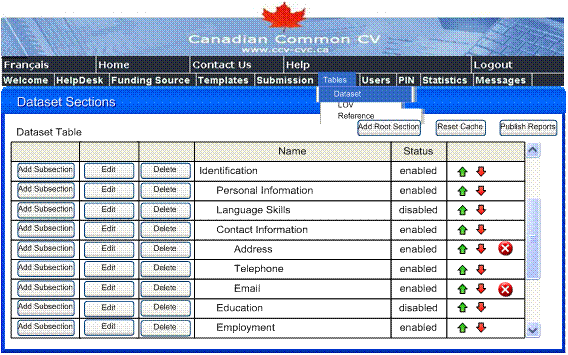
Table 3-50 Fields for CCV Admin - Tables – Dataset –
Dataset Sections screen
|
Field |
Validation Rules |
|
Dataset Table |
N/A |
|
Name |
Display only of Section Name (English or French depending on UI language) |
|
Status |
Display only of Section Status |
|
Ordering and Errors |
Ordering icons: When the Move Up icon or Move Down icon is selected, the page will refresh and reposition the selected entry within the parent section in the table to reflect the requested move. User cannot move a section within a parent section if there is no room for it to move in that direction. Error icons: If the associated grid entry has a validation error, this column will contain an error icon. When the status of a section is being determined, the applicable validation rules will be applied starting with the top-level section and following the hierarchy to its lowest level. Errors detected at any level of the hierarchy will result in an ‘error’ status; conversely, all sections in the hierarchy must pass all validations for the status to be ‘valid’. An example of such a validation is: Mandatory which can apply to a Section and/or a Field. |
Table 3-51 Buttons for CCV Admin - Tables – Dataset –
Dataset Sections screen
|
Button |
Functionality |
|
Add Root Section button |
Displays the CCV Admin - Tables – Dataset – Section Details page in Add mode to add a root section to the Dataset. |
|
Reset Cache button |
Displayed and Enabled. Resets the cache; Performs an automatic request to load all Dataset updates into the cache; Redisplays current screen |
|
Publish Reports button |
Only displayed and enabled for a SuperAdmin user Calls the report service to automatically publish the following reports: · XSD Generic Schema (diagram); · XSD Generic Schema (definition); · XSD Generic Schema (documentation); · Generic CV (documentation); · List of Values (LOV) (documentation); and · List of Reference Tables; Redisplays current screen |
|
Add Subsection icon |
Displays the CCV Admin - Tables – Dataset – Section Details page in Add mode to add a subsection to the selected section. |
|
Edit icon |
Displays the CCV Admin - Tables – Dataset – Section Details page in Edit mode for the selected section. |
|
Delete icon |
Displays confirmation screen with ‘Yes’ and ‘No’ options. If No is selected, redisplays the current screen; If Yes is selected, validates to confirm Section was not used in a Template or a Generic CV and if passes validation, deletes the section and all its sub-sections and fields from the database and redisplays this screen. |
This screen allows the
SuperAdmin to view, add and modify the Dataset sections. The user can also use
this screen to add, modify and delete fields for the displayed section.
Note: A section must
be enabled to be displayed on the Templates and CV screens.
Figure 3-35 CCV
Admin - Tables – Dataset – Section Details Window
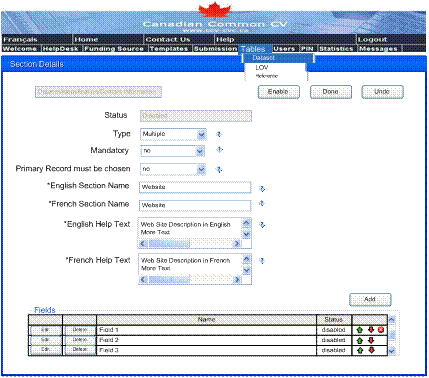
Table 3-52 Fields for CCV Admin - Tables – Dataset –
Section Details screen
|
Field |
Validation Rules |
|
Navigation path |
Provides navigation path of Section Names to get to this screen (e.g. if adding new subsection CC to an existing subsection BBB of section AAAA, would display AAAA/BBB). Displays English Section Name(s) in path if display of screen is currently English, and displays French Section Name(s), otherwise. |
|
Status |
Display only of Status of Section. |
|
Type |
Defines Section Type. |
|
Mandatory |
Defines whether or not Section is mandatory in a CV. |
|
Primary record must be chosen |
Primary record must be chosen must = ‘No’ if Section Type = ‘Single’. If a Section is defined as a multiple and this entity = ‘Yes’, it means that one and only one of the Section entries must be identified as the primary entry. |
|
English Section Name |
Mandatory and must be unique within the parent Section. |
|
French Section Name |
Mandatory and must be unique within the parent Section. |
|
English Help Text |
Mandatory |
|
French Help Text |
Mandatory |
|
Fields |
Lists all Fields for this Section. |
|
Name |
If display of screen is currently English, displays English Field Name; Otherwise, displays French Field Name. |
|
Status |
Display only of Field Status |
|
Ordering and Errors |
Ordering icons: When the Move Up icon or Move Down icon is selected, the page will refresh and reposition the selected entry within the table to reflect the requested move. User can only move a field within a parent section if there is room for it to move in that direction. Error icons: If the associated grid entry has a validation error, this column will contain an error icon. |
Table 3-53 Buttons for CCV Admin - Tables – Dataset –
Section Details screen
|
Button |
Functionality |
|
Add |
Enabled If the Section’s Status = ‘Enabled’, performs the validation rules, and if at least one validation fails, changes Status of Section to ‘Disabled’. Saves the data entered on the current page to the database, and displays CCV Admin – Tables - Dataset – Add Field - Select Display Type page (to be used to invoke the CCV Admin – Tables - Dataset – Field Details page in Add mode, setting the new Field entry as a child to the current Section entry). |
|
Edit |
If the Section’s Status = ‘Enabled’, performs the validation rules, and if at least one validation fails, changes Status of Section to ‘Disabled’. Saves the data entered on the current page to the database and displays the CCV Admin – Tables - Dataset – Field Details page in Edit mode for the selected field. |
|
Delete |
Displays confirmation screen with ‘Yes’ and ‘No’ options. If No is selected, redisplays the current screen. If Yes is selected, validates the selected Field to confirm it is not used in a Template or a Generic CV, then, if the selected Field is an LOV-type field, validates to ensure that it does not have any fields that are dependent on it. If it passes all validations, it is deleted from the database. If the parent Section is enabled, it is validated and if deleting the field has made the parent section invalid the status of the section will be set to ‘disabled’. Redisplays this screen. |
|
Disable |
Only displayed and enabled if Status of
Section is ‘Enabled’. Saves the data entered on the current
page to the database and changes Status of Section to ‘Disabled’. Redisplays this screen. |
|
Enable |
Only displayed and enabled if Status of
Section is ‘Disabled’. Saves the data entered on the current page to the database and performs the validation starting with the top-level section and following the hierarchy to its lowest level. If validation rules are successful, changes
Status of Section to ‘Enabled’, saves change to database and redisplays this
page. |
|
Done |
Saves the data entered on the current page to the database. If the Section’s Status = ‘Enabled’, performs the validation rules starting with the top-level section and following the hierarchy to its lowest level. If at least one validation fails: · Sets the Section’s Status to ‘Disabled’; Saves change to database; Returns to and displays the CCV Admin – Tables - Dataset – Dataset Sections Page. |
|
Undo |
Disabled upon first entry to the screen and
whenever a save is posted to the database. Enabled as soon as any changes are made to
the fields on this screen. When selected, it undoes any changes made to the fields on the current screen since the last database save, disables the Undo button; and redisplays this screen. |
|
? |
Displays the help for the selected entry. |
This screen is displayed
when the user is adding a field to a section in the Dataset. It allows the user
to select the type of field it will be (e.g. string, date, etc.).
Figure 3-36 CCV
Admin - Tables – Dataset – Add Field – Select Display Type Window
Table 3-54 Fields for CCV Admin - Tables – Dataset – Add
Field – Select Display Type screen
|
Field |
Validation Rules |
|
Navigation path |
Provides navigation path of Section Names to get to this screen (e.g. if adding a field DD to subsection CC of subsection BBB of section AAAA, would display AAAA/BBB/CC). Displays English Section Name(s) in path if display of screen is currently English, and displays French Section Name(s), otherwise. |
|
Select Display Type |
Must select the type of Field being defined before pressing the ‘Next’ button. |
Table 3-55 Buttons for CCV Admin - Tables – Dataset – Add
Field – Select Display Type screen
|
Button |
Functionality |
|
Next |
If LOV was selected as the Data Type: · Displays the CCV Admin – Tables - Dataset – Add LOV-Type Field - Select LOV page retaining the data type selected; If Reference was selected as the Data Type: · Displays the CCV Admin – Tables - Dataset – Add Reference-Type Field - Select Reference page retaining the data type selected; Otherwise: · Displays the CCV Admin – Tables - Dataset – Field Details page retaining the data type selected. |
|
Cancel |
Returns to the CCV
Admin – Tables - Dataset – Section Details Page without saving any data entered on the
current page. |
|
? |
Displays the help for the selected entry. |
This screen is
displayed if the field being added is an LOV-type of field. It allows the user to select which LOV table
to associate to the field.
Figure 3-37 CCV
Admin - Tables – Dataset – Add LOV-type Field - Select LOV Window
Table 3-56 Fields for CCV Admin - Tables – Dataset – Add
LOV-type Field - Select LOV screen
|
Field |
Validation Rules |
|
Navigation path |
Provides navigation path of Section Names and Field Name to get to this screen (e.g. if adding a field DD to subsection CC of subsection BBB of section AAAA, would display AAAA/BBB/CC/DD). Displays English Section/Field Name(s) in path if display of screen is currently English, and displays French Section/Field Name(s), otherwise. |
|
Select LOV to associate to Field |
Displays list of all List Of Values (LOV) Table Names with Status = ‘Enabled’ (in language that had been selected by user) to allow user to select the LOV table this field should be linked to. |
Table 3-57 Buttons for CCV Admin - Tables – Dataset – Add
LOV-type Field - Select LOV screen
|
Button |
Functionality |
|
Prev |
Returns to the CCV
Admin – Tables - Dataset – Add Field - Select Display Type page. |
|
Next |
Displays the CCV Admin – Tables - Dataset – Field Details page
retaining the selected LOV Table Name to be associated to the LOV-Type of
Field. |
|
Cancel |
Returns to the CCV
Admin – Tables - Dataset – Section Details Page without saving any data entered on the
current page. |
|
? |
Displays the help for the selected entry. |
This screen is
displayed if the field being added is a Reference-type of field. It allows the user to select which Reference
table to associate to the field.
Figure 3-38 CCV Admin - Tables – Dataset – Add Reference-type Field - Select
Reference Window
Table 3-58 Fields
for CCV Admin - Tables – Dataset – Add Reference-type Field - Select Reference
screen
|
Field |
Validation Rules |
|
Navigation path |
Provides navigation path of Section Names and Field Name to get to this screen (e.g. if adding a field DD to subsection CC of subsection BBB of section AAAA, would display AAAA/BBB/CC/DD). Displays English Section/Field Name(s) in path if display of screen is currently English, and displays French Section/Field Name(s), otherwise. |
|
Select Reference to associate to Field |
Displays list of all Reference Table Names with Status = ‘Enabled’ (in language that had been selected by user) to allow user to select the Reference table this field should be linked to. |
Table 3-59 Buttons
for CCV Admin - Tables – Dataset – Add Reference-type Field - Select Reference
screen
|
Button |
Functionality |
|
Prev |
Returns to the CCV
Admin – Tables - Dataset – Add Field - Select Display Type page. |
|
Next |
Displays the CCV Admin – Tables - Dataset – Field Details page
retaining the selected Reference Table Name to be associated to the
Reference-Type of Field. |
|
Cancel |
Returns to the CCV
Admin – Tables - Dataset – Section Details Page without saving any data entered on the
current page. |
|
? |
Displays the help window for the selected
entry. |
This screen allows the
user to view, add or modify details and constraints for the field being
displayed.
Figure 3-39 CCV
Admin - Tables – Dataset – Field Details Window

Table 3-60 Fields for CCV Admin - Tables – Dataset – Field
Details screen
|
Field |
Validation Rules |
|
Navigation path |
Provides navigation path of Section Names to get to this screen (e.g. if adding a field DDDDD to section CC which is a subsection of subsection BBB of section AAAA, would display AAAA/BBB/CC). Displays English Section Name(s) in path if display of screen is currently English, and displays French Section Name(s), otherwise. |
|
Section |
Displays English Section Name if display of screen is currently English, and displays French Section Name, otherwise. |
|
Status |
If the Status of the Field is ‘Enabled’, then it will be displayed for the parent section when that section is being displayed dynamically on the Manage CV screens. |
|
Display Type |
Display of Field Data Type. |
|
LOV |
Only displayed if Field Data Type is ‘LOV’. Display of Name of LOV Table (English if screen is currently displayed in English, French otherwise) this LOV-type Field is linked to. |
|
Default Value |
Only displayed if Field Data Type is ‘LOV’. Optional Allows user to select value that will be the default value set when this LOV drop-down list is displayed dynamically on the Manage CV screens. |
|
Reference |
Only displayed if Field Data Type is ‘Reference’. Display of Name of Reference Table (English if screen is currently displayed in English, French otherwise) this Reference-type Field is linked to. |
|
String max field length |
Only displayed and enabled if Field Data Type is ‘String’. Optional Sets the maximum length for a String type of field. |
|
Mandatory |
If Mandatory = ‘Yes’ for a field, this field will be mandatory when it is displayed dynamically on the Manage CV screens, both on the Generic CV and in any template that uses it. Must = ‘No’ if there are entries in the LOV Dependency or Mutually Exclusive Dependency grid. |
|
Display Column |
Only displayed if Section is a Multiple type of Section. If Display Column = ‘Yes’ for a field, this field will be displayed as a column when it belongs to a multiple-type section grid that is being displayed dynamically on the Manage CV screens. |
|
Repeat value selection allowed |
Only display if parent Section is a Multiple type of Section and field is an LOV-type of field. If Repeat value selection allowed = ‘No’ for a field, it means that when a researcher is entering values on the Manage CV screens, the same value cannot occur more than once within a multiple-type parent section. (e.g. in Section Language Skills, English can only occur once). |
|
English Field Name |
Mandatory and must be unique within its Section |
|
French Field Name |
Mandatory and must be unique within its Section |
|
English Help Text |
Mandatory |
|
French Help Text |
Mandatory |
|
LOV Value Dependency |
Lists all LOV Dependencies for this Field. If a field has an LOV Dependency, the fields it depends upon will determine whether it requires a value or not. |
|
Field |
If display of screen is currently English, displays English Field Name of Field this field is dependent on; Otherwise, displays French Field Name of Field this field is dependent on. Must be unique within the LOV Value dependency grid. |
|
LOV Table |
If display of screen is currently English, displays English LOV Table Name associated to LOV-type Field this field is dependent on; Otherwise, displays French LOV Table Name associated to LOV-type Field this field is dependent on. |
|
Value |
If display of screen is currently English, displays the English Element Names (separated by commas) for the LOV-type Field this field is dependent on; Otherwise, displays French Element Names (separated by commas) for the LOV-type Field this field is dependent on. |
|
Equals |
Displays condition the user selected for the values in the Values grid. e.g. if user wants field A to only be optionally entered when LOV-type field B (associated to LOV Table ABC) is not = (x or y): Mandatory would be set to ‘No’; Equals would be set to ‘No’; and there would be 1 entry in the grid for Field B, with 2 items in the Value column for this row: x y |
|
Mandatory |
Displays requirement for whether field should be mandatory or not when associated condition is satisfied. e.g. if user wants field A to be mandatory when LOV-type field B (associated to LOV Table ABC) is = (x or y): Mandatory would be set to ‘Yes’; Equals would be set to ‘Yes’; and there would be 1 entry in the grid for Field B, with 2 items in the Value column for this row: x y |
|
Errors |
If the associated grid entry has a validation error, this column will contain an error icon. |
|
Mutually Exclusive Dependency |
Lists all Mutually Exclusive Dependencies for this Field. If a field has a Mutually Exclusive Dependency, the fields it depends upon will determine whether it requires a value or not. |
|
Field |
If display of screen is currently English, displays English Field Name of Field this field is dependent on; Otherwise, displays French Field Name of Field this field is dependent on. A Field entry must be unique within the Mutually Exclusive dependency grid. |
|
Mandatory |
Displays requirement for whether field should be mandatory or not when associated condition is satisfied. e.g. if user wants field A to be mandatory when field B is null: Mandatory would be set to ‘Yes’; and there would be 1 entry in the grid for Field B. |
|
Errors |
Display only of icon in the event of a validation error for the associated grid entry. |
|
PubMed-filled Fields |
Lists all fields to be filled via a PubMed retrieve for this Field. |
|
Field |
Displays English Name of CCV Field that will be populated on the CV screens by the PubMed retrieve |
|
PubMed Field |
Displays English Name of PubMed Field that will be retrieved by the PubMed retrieve when invoked on the CV screens |
|
Errors |
Display only of icon in the event of a validation error for the associated grid entry. |
Table 3-61 Buttons for CCV Admin - Tables – Dataset –
Field Details screen
|
Button |
Functionality |
|
Add button above LOV Value dependency grid |
If the Field’s Status = ‘Enabled’: performs the validation rules and if at least one validation fails, validates to confirm that
disabling this field does not break any dependency constraints: if dependency
constraints would be broken, displays error message on current screen,
otherwise, changes Status of Field to ‘Disabled’, saves the data entered on
the current page to the database and displays CCV Admin – Tables - Dataset –
Add LOV Dependency - Select Field page (to be used to invoke the CCV Admin –
Tables - Dataset – LOV Value Dependency – Set Dependency page in Add mode, to
add an entry to the LOV Value dependency grid). |
|
Edit button for each entry of LOV Value
dependency grid |
If the Field’s Status = ‘Enabled’, performs the validation rules, and if at least one validation fails, validates to confirm that
disabling this field does not break any dependency constraints: if dependency
constraints would be broken, displays error message on current screen,
otherwise, changes Status of Field to ‘Disabled’, saves the data entered on
the current page and displays CCV Admin – Tables - Dataset – Add LOV
Dependency – Set Dependency page in Edit mode for the selected LOV dependency
entry. |
|
Delete button for each entry of LOV Value
dependency grid |
Displays confirmation screen with ‘Yes’ and ‘No’ options. If No is selected, redisplays the current screen. If Yes is selected: If the Field’s Status = ‘Enabled’, performs the validation rules, and if at least one validation fails: validates to confirm that disabling this field does not break any dependency constraints: if dependency constraints would be broken, displays error message on current screen; otherwise: sets Status of Field to ‘Disabled’; deletes the selected LOV Value Dependency from the grid; and saves the data entered on the current page, as well as any other changes, to the database and redisplays this screen; otherwise: does not change Field’s status; deletes the selected LOV Value Dependency from the grid; and saves the data entered on the current page, as well as any other changes, to the database and redisplays this screen. |
|
Add button above Mutually Exclusive
dependency grid |
If the Field’s Status = ‘Enabled’, performs the validation rules, and if at least one validation fails, validates to confirm that disabling this field does not break any dependency constraints: if dependency constraints would be broken, displays error message on current screen, otherwise, changes Status of Field to ‘Disabled’, saves the data entered on the current page and displays CCV Admin – Tables - Dataset – Mutually Exclusive Dependency – Set Dependency page in Add mode, to add an entry to the Mutually Exclusive dependency grid. |
|
Edit button for each entry of Mutually
Exclusive dependency grid |
If the Field’s Status = ‘Enabled’, performs the validation rules, and if at least one validation fails, validates to confirm that
disabling this field does not break any dependency constraints: if dependency
constraints would be broken, displays error message on current screen,
otherwise, changes Status of Field to ‘Disabled’, saves the data entered on
the current page and displays CCV Admin – Tables - Dataset – Add Mutually
Exclusive Dependency page in Edit mode for the selected Mutually Exclusive
dependency entry. |
|
Delete button for each entry of Mutually
Exclusive dependency grid |
Displays confirmation screen with ‘Yes’ and ‘No’ options. If No is selected, redisplays the current screen. If Yes is selected: If the Field’s Status = ‘Enabled’, performs the validation rules, and if at least one validation fails: validates to confirm that disabling this field does not break any dependency constraints: if dependency constraints would be broken, displays error message on current screen; otherwise: sets Status of Field to ‘Disabled’; deletes the selected Mutually Exclusive Dependency from the grid; and saves the data entered on the current page, as well as any other changes, to the database and redisplays this screen; otherwise:
does not change Field’s status; deletes the selected Mutually Exclusive
Dependency from the grid; and saves the data entered on the current page, as
well as any other changes, to the database and redisplays this screen. |
|
Add button above PubMed-filled Fields grid |
Only displayed and enabled if Field has Type = PubMed; If the Field’s Status = ‘Enabled’, performs the validation rules, and if at least one validation fails, validates to confirm that
disabling this field does not break any dependency constraints: if dependency
constraints would be broken, displays error message on current screen,
otherwise, changes Status of Field to ‘Disabled’, saves the data entered on
the current page and displays the CCV Admin – Tables - Dataset –
PubMed-filled Fields – add fields page in Add mode, to add an entry to the PubMed-filled
Fields grid. |
|
Edit button for each entry of PubMed-filled
Fields grid |
Only displayed and enabled if Field has Type = PubMed; If the Field’s Status = ‘Enabled’, performs the validation rules, and if at least one validation fails, validates to confirm that
disabling this field does not break any dependency constraints: if dependency
constraints would be broken, displays error message on current screen,
otherwise, changes Status of Field to ‘Disabled’, saves the data entered on
the current page and displays CCV Admin – Tables - Dataset – PubMed-filled Fields
– add fields page in Edit mode for the selected entry. |
|
Delete button for each entry of PubMed-filled
Fields grid |
Displays confirmation screen with ‘Yes’ and ‘No’ options. If No is selected: Redisplays the current screen. If Yes is selected: If the Field’s Status = ‘Enabled’, performs the validation rules, and if at least one validation fails: validates to confirm that disabling this field does not break any dependency constraints: if dependency constraints would be broken, displays error message on current screen; otherwise: sets Status of Field to ‘Disabled’; deletes the selected PubMed-filled Field from the grid; and saves the data entered on the current page, as well as any other changes, to the database and redisplays this screen; otherwise:
does not change Field’s status; deletes the selected PubMed-filled Field from
the grid; and saves the data entered on the current page, as well as any
other changes, to the database and redisplays this screen. |
|
Disable |
Only displayed and Enabled if Status of Field
is ‘Enabled’. Validates to confirm that disabling this field does not break any dependency constraints: If there are no dependencies on this field: Saves the data entered on the current page to the database; Changes Status of Field to ‘Disabled’ and
saves change to database; Redisplays this screen. |
|
Enable |
Only displayed and Enabled if Status of Field
is ‘Disabled’. Saves the data entered on the current page to the database. Performs the validation rules and if at least one validation fails, ·
Redisplays this screen with
message displayed at top of screen ‘Cannot enable due to validation errors’; Otherwise, If validation rules are successful: ·
Changes Status of Field to
‘Enabled’ and saves to database; ·
Redisplays this screen. |
|
Done |
Saves the data entered on the current page to the database. If the Field’s Status = ‘Enabled’: Performs the validation rules and if at least one validation fails: · Sets the Field’s Status to ‘Disabled’; Returns to and displays the CCV Admin – Tables - Dataset – Section Details Page with the data refreshed. |
|
Undo |
Disabled upon first entry to the screen and
whenever a save is posted to the database. Enabled as soon as any changes are made to
the fields on this screen. When selected, it undoes any changes made to the fields on the current screen since the last database save, disables the Undo button; and redisplays this screen. |
|
? |
Displays the help for the selected entry. |
This screen is
displayed when a user is adding a LOV Value dependency. It allows the user to
select which LOV field the current field will be dependent on.
Figure 3-40 CCV
Admin - Tables – Dataset – Add LOV Value Dependency - Select Field Window
Table 3-62 Fields for CCV Admin - Tables – Dataset – Add
LOV Value Dependency - Select Field screen
|
Field |
Validation Rules |
|
Navigation path |
Provides navigation path of Section Names to get to this screen (e.g. if adding a field DDDDD to section CC which is a subsection of subsection BBB of section AAAA, would display AAAA/BBB/CC). Displays English Section Name(s) in path if display of screen is currently English, and displays French Section Name(s), otherwise. |
|
Field Name |
Displays English Field Name(s) of field being modified/added if display of screen is currently English, and displays French Field Name(s), otherwise. |
|
Select Field to set dependency |
Mandatory Displays list of all LOV-type fields within the lowest Section (e.g. in example above – it would be within section CC) with the exception of the current field; There must be entries in the drop-down list (i.e. other LOV type fields for the parent section). |
Table 3-63 Buttons for CCV Admin - Tables – Dataset – Add
LOV Value Dependency - Select Field screen
|
Button |
Functionality |
|
Next |
Displays the CCV Admin – Tables - Dataset – LOV Value Dependency –
Set Dependency page retaining the selected LOV-type Field and its associated
LOV Table Name to be used to set a dependency for the current field. |
|
Cancel |
Returns to the CCV
Admin – Tables - Dataset – Field Details Page without saving any data entered on the current page. |
|
? |
Displays the help for the selected entry. |
This screen is
displayed when a user is defining a LOV Value dependency and has selected the
LOV field the current field will be depending on. This screen allows the user
to set up a list of values for the LOV field upon which the current field will
have a dependency and define the constraints of the dependency.
Figure 3-41 CCV
Admin - Tables – Dataset – LOV Value Dependency - Set Dependency Window
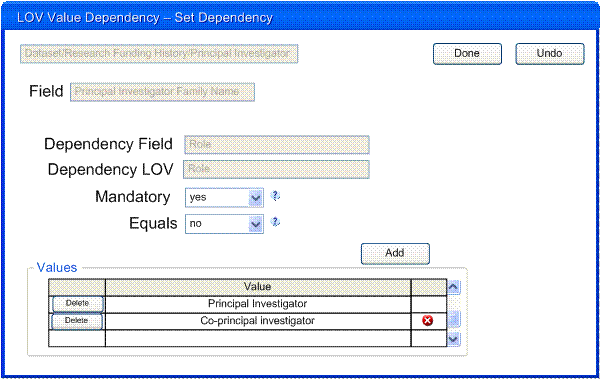
Table 3-64 Fields for CCV Admin - Tables – Dataset – LOV
Value Dependency - Set Dependency screen
|
Field |
Validation Rules |
|
Navigation path |
Provides navigation path of Section Names to get to this screen (e.g. if adding a field DDDDD to section CC which is a subsection of subsection BBB of section AAAA, would display AAAA/BBB/CC). Displays English Section Name(s) in path if display of screen is currently English, and displays French Section Name(s), otherwise. |
|
Field |
Displays English Field Name(s) of field being modified / added if display of screen is currently English, and displays French Field Name(s), otherwise. |
|
Dependency Field |
Displays English Field Name(s) of Dependency Field selected on the Add LOV Value Dependency – Select Field page if display of screen is currently English, and displays French Field Name(s), otherwise. A Field entry must be unique within the LOV Value dependency grid for the Field being defined |
|
Dependency LOV |
Displays LOV Table Name associated with dependency Field selected on the Add LOV Value Dependency – Select Field page. |
|
Mandatory |
Allows user to set the condition for whether the field will be mandatory (if Mandatory = ‘Yes’) or optional (if Mandatory = ‘No’) if the LOV dependency condition is met. e.g. if user wants field A to be mandatory when LOV-type field B (associated to LOV Table ABC) is = (x or y): Mandatory would be set to ‘Yes’; Equals would be set to ‘Yes’; and there would be 2 entries in the Values grid: x y |
|
Equals |
Allows user to set the condition for the values in the Values grid. e.g. if user wants field A to only be entered when LOV-type field B (associated to LOV Table ABC) is not = (x or y): Equals would be set to ‘No’; and there would be 2 entries in the Values grid: x y |
|
Values |
Lists all values for the dependency field that the current field is dependent on. |
|
Value |
If display of screen is currently English, displays the English Element Name for the LOV-type Field this field is dependent on; Otherwise, displays French Element Name for the LOV-type Field this field is dependent on. A Value entry must be unique within the Values grid for the LOV Dependency being defined. |
|
Errors |
Display only of icon in the event of a validation error for the associated grid entry. |
Table 3-65 Buttons for CCV Admin - Tables – Dataset – LOV
Value Dependency - Set Dependency screen
|
Button |
Functionality |
|
Add |
If the Field’s Status = ‘Enabled’, performs the validation rules, and if at least one validation fails, changes Status of Field to ‘Disabled’. Saves the data entered on the current page to the database. Displays CCV Admin –
Tables - Dataset – Add LOV Value to Dependency List page (to be used to add an entry to the
Values grid). |
|
Delete |
Displays confirmation screen with ‘Yes’ and ‘No’ options. If No is selected, redisplays the current screen. If Yes is selected: If the Field’s Status = ‘Enabled’, performs the validation rules, and if at least one validation fails, sets Status of Field to ‘Disabled’, otherwise does not change Field’s status; Deletes the selected Value from the LOV Value Dependency on the database for this field; and Redisplays this screen. |
|
Done |
Saves the data entered on the current page to the database. If the Field’s Status = ‘Enabled’: Performs the validation rules and if at least one validation fails: · Sets the Field’s Status to ‘Disabled’; Saves change to database; Returns to and displays the CCV Admin – Tables - Dataset – Field Details Page with the data refreshed. |
|
Undo |
Disabled upon first entry to the screen and
whenever a save is posted to the database. Enabled as soon as any changes are made to
the fields on this screen. When selected, it undoes any changes made to the fields on the current screen since the last database save, disables the Undo button; and redisplays this screen. |
|
? |
Displays the help for the selected entry. |
This screen will allow
the user to select a value to add to the Values grid on the LOV Value
Dependency - Set Dependency Window.
Figure 3-42 CCV
Admin - Tables – Dataset – Add LOV Value to Dependency List Window

Table 3-66 Fields for CCV Admin - Tables – Dataset – Add
LOV Value to Dependency List screen
|
Field |
Validation Rules |
|
Navigation path |
Provides navigation path of Section Names to get to this screen (e.g. if adding a field DDDDD to section CC which is a subsection of subsection BBB of section AAAA, would display AAAA/BBB/CC). Displays English Section Name(s) in path if display of screen is currently English, and displays French Section Name(s), otherwise. |
|
Field |
Displays English Field Name(s) of field being modified/added if display of screen is currently English, and displays French Field Name(s), otherwise. (e.g. in example above, would display DDDDD). |
|
Dependency Field |
Displays English Field Name(s) of Dependency Field selected on the Add LOV Value Dependency – Select Field page if screen is currently English, and displays French Field Name(s), otherwise. (Refer to Section 3.9 of this document). |
|
Dependency LOV |
Displays LOV Table Name associated with Dependency Field selected on the Add LOV Value Dependency – Select Field page. (Refer to Section 3.10 of this document). |
|
Select LOV Value to set dependency |
Displays all active Element Names (i.e. values) for the LOV that are not already in the Dependency List of Values grid for this field A Value entry must be unique within the Values grid for the LOV Dependency being defined |
Table 3-67 Buttons for CCV Admin - Tables – Dataset – Add
LOV Value to Dependency List screen
|
Button |
Functionality |
|
Done |
Saves the data entered on the current page to the database. If the Field’s Status = ‘Enabled’: Performs the validation rules and if at least one validation fails: · Sets the Field’s Status to ‘Disabled’; Saves change to database; Returns to and displays the CCV Admin – Tables - Dataset – LOV
Value Dependency – Set Dependency Page with the data refreshed. |
|
Cancel |
Returns to the CCV
Admin – Tables - Dataset – LOV Value Dependency – Set Dependency page without saving any data entered on the
current page. |
|
? |
Displays the help for the selected entry. |
This screen is
displayed when a user adds entries to the PubMed-filled Fields grid on the
Field Details screen. The user will use
it to define which fields in the Dataset will be populated with the selected
PubMed data that is associated to the current field when the Retrieve button is
pressed on the CV screens.
Figure 3-43 CCV
Admin - Tables – Dataset – PubMed-filled Fields - add fields Window
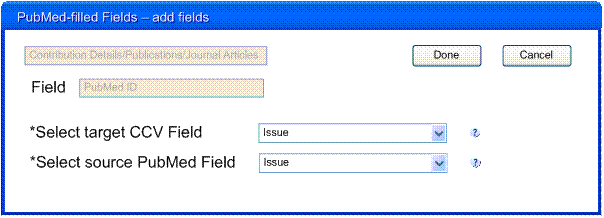
Table 3-68 Fields for CCV Admin - Tables – Dataset –
PubMed-filled Fields - add fields screen
|
Field |
Validation Rules |
|
Navigation path |
Provides navigation path of Section Names to get to this screen (e.g. if adding a field DDDDD to section CC which is a subsection of subsection BBB of section AAAA, would display AAAA/BBB/CC). Displays English Section Name(s) in path if display of screen is currently English, and displays French Section Name(s), otherwise. |
|
Field |
Displays English Field Name(s) of field being modified/added if display of screen is currently English, and displays French Field Name(s), otherwise. (e.g. in example above, would display DDDDD). A Field entry must be unique within the PubMed-filled Fields grid being defined |
|
Select target CCV Field |
Mandatory; if null return message 70. Displays all other Field Names for the current field’s parent Section that are not already in the PubMed-filled Fields grid for the current field and that are string-type fields. |
|
Select source PubMed Field |
Mandatory; if null return message 70. Displays all PubMed Field Names accessible for retrieval. |
Table 3-69 Buttons for CCV Admin - Tables – Dataset –
PubMed-filled Fields - add fields screen
|
Button |
Functionality |
|
Done |
Saves the data entered on the current page to the database. If the Field’s Status = ‘Enabled’: Performs the validation rules and if at least one validation fails: · Sets the Field’s Status to ‘Disabled’; Saves change to database; Returns to and displays the CCV Admin – Tables - Dataset – Field
Details page with the data refreshed. |
|
Cancel |
Returns to the CCV
Admin – Tables - Dataset – Field Details page without saving any data entered on the current page. |
|
? |
Displays the help for the selected entry. |
This screen is
displayed when a user is adding an entry to the Mutually Exclusive dependency
grid on the Field Details screen. On this screen, the user must select another
field within the lowest parent section and define whether it is mandatory to
have one or the other or if both could be empty (i.e. dependency is optional).
Figure 3-44 CCV
Admin - Tables – Dataset – Add Mutually Exclusive Dependency Window
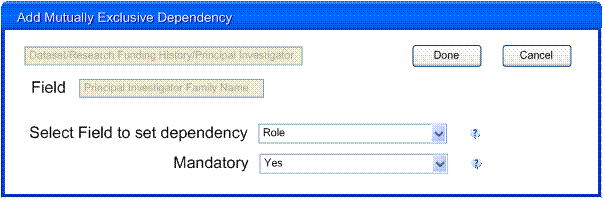
Table 3-70 Fields for CCV Admin - Tables – Dataset – Add
Mutually Exclusive Dependency screen
|
Field |
Validation Rules |
|
Navigation path |
Provides navigation path of Section Names to get to this screen (e.g. if adding a field DDDDD to section CC which is a subsection of subsection BBB of section AAAA, would display AAAA/BBB/CC). Displays English Section Name(s) in path if display of screen is currently English, and displays French Section Name(s), otherwise. |
|
Field |
Displays English Field Name(s) of field being modified/added if display of screen is currently English, and displays French Field Name(s), otherwise. (e.g. in example above, would display DDDDD). |
|
Select Field to set dependency |
Mandatory Displays list of all fields within the lowest parent Section (e.g. in example above – it would be within section CC) with the exception of the current field; There must be entries in the drop-down list (i.e. other fields for the parent section). |
|
Mandatory |
Allows user to set the condition for whether the field will be mandatory (if Mandatory = ‘Yes’) or optional (if Mandatory = ‘No’) if the mutually exclusive dependency condition is met. e.g. if user wants field A to be mandatory when field B is = null: · Field B would be selected from the drop-down; and · Mandatory would be set to ‘Yes’. |
Table 3-71 Buttons for CCV Admin - Tables – Dataset – Add
Mutually Exclusive Dependency screen
|
Button |
Functionality |
|
Done |
Saves the data entered on the current page to the database. If the Field’s Status = ‘Enabled’: Performs the validation rules, and if at least one validation fails: · Sets the Field’s Status to ‘Disabled’; Saves change to database; Returns to and displays the CCV Admin – Tables - Dataset – Field
Details Page with the data refreshed. |
|
Cancel |
Returns to the CCV
Admin – Tables - Dataset – Field Details page without saving any data entered on the current page. |
|
? |
Displays the help for the selected entry. |
The SuperAdmin
user has logged in successfully and accessed the CCV Admin application / Table
menu item / Reference sub-menu item for the purposes of:
· Viewing a listing of all Reference Tables;
· Adding or modifying a Reference Table;
· Viewing, adding or modifying a value in a Reference Table.
Figure 3-45 CCV
Admin - Tables – Reference – Reference Table Names Window

Table 3-72 Fields for CCV Admin - Tables – Reference –
Reference Table Names screen
|
Field |
Validation Rules |
|
Reference Tables |
Lists all Reference tables from the database, in alphabetical order by Reference Table Name (English or French reference table name depending on language of UI). |
|
Table Name |
Displays Reference Table Name (English or French depending on UI language) |
|
Status |
Display only of Reference Table Status |
|
Errors |
Errors: Display only of icon in the event of a validation error for the associated grid entry. |
Table 3-73 Buttons
for CCV Admin - Tables – Reference – Reference Table Names screen
|
Button |
Functionality |
|
Add button |
Displays the CCV Admin - Tables – Reference – Reference Details page in Add mode to add a new Reference table. |
|
Edit icon |
Displays the CCV Admin - Tables – Reference – Reference Details page in Edit mode for the selected Reference table. |
This screen allows the
SuperAdmin user to view, add or change a Reference table name in the top
portion of the screen. The bottom portion of the screen allows the SuperAdmin
to view, add or change the elements (i.e. values) within the Reference table.
Note: only enabled tables and values will be displayed in the Reference Tables
drop-down list on the CCV Admin - Tables – Reference - Select Table screen and
on the Dataset screens. Pressing the Display Values button will open the CCV
Admin – Tables - Reference – Select Values to Manage Page.
Note: Once a table has
values, its structure is locked and the Add and Delete buttons for the
Reference and LOV tables grid are unavailable.
Figure 3-46 CCV Admin – Tables – Reference – Reference Details Window

Table 3-74 Fields for CCV Admin – Tables – Reference –
Reference Details screen
|
Field |
Validation Rules |
|
Status |
Display only. If the Status of the Reference Table is ‘Enabled’, then it will be displayed in the drop-down list when the Reference Tables are displayed on the Dataset screens. An enabled table must have at least 1 enabled entry in the Reference and LOV tables list in order to be valid |
|
English Table Name |
Mandatory English Reference Table Names must be unique within database |
|
French Table Name |
Mandatory French Reference Table Names must be unique within database |
|
English Name of Lowest Level |
Mandatory |
|
French Name of Lowest Level |
Mandatory |
|
Elements |
Lists all elements (LOV and Reference tables) for the selected Reference Table |
|
Name |
Display only of element’s English or French Name depending on language of UI. |
|
Errors |
Display only of icon in the event of a validation error for the associated grid entry. |
Table 3-75 Buttons for CCV Admin – Tables – Reference –
Reference Details screen
|
Button |
Functionality |
|
Add |
Only displayed if Reference table does not contain any values. If the Reference table’s Status = ‘Enabled’, performs the validation rules, and if at least one validation fails, · Changes Status of Reference Table to ‘Disabled’; Saves the data entered on the current page to the database; Displays the Reference - Select Type of Table page. |
|
Delete button for each entry in the Reference
and LOV tables grid |
Only displayed if Reference table does not contain any values. Displays confirmation screen with ‘Yes’ and ‘No’ options. If No is selected: Redisplays the current screen. If Yes is selected: · Deletes entry from the grid; · If the Reference table’s Status = ‘Enabled’, performs the validation rules, and if at least one validation fails, sets Reference table’s Status to ‘Disabled’; otherwise does not change Reference table’s Status; · Saves the data to the database; and · Redisplays this screen. |
|
Disable |
Only displayed and enabled if Status of
Reference table is ‘Enabled’. Changes Status of Reference table to ‘Disabled’ and saves the data entered on the current page to the database. Redisplays this screen. |
|
Enable |
Only displayed if Status of Reference table
is ‘Disabled’. Saves the data entered on the current page to the database. Performs the validation rules and if at least one validation fails, ·
Redisplays this screen with
error message displayed at top of screen ‘Cannot enable due to validation
errors’; Otherwise, If validation is successful: ·
Changes Status of Reference
table to ‘Enabled’ and saves change to database; ·
Redisplays this screen. |
|
Display Values button |
Only displayed if there are entries in the Reference and LOV tables grid. Saves the data entered on the current page to the database. If the Reference table’s Status = ‘Enabled’: Performs the validation rules and if at least one validation fails: · Sets the Reference Table’s Status to ‘Disabled’; Displays the CCV Admin – Tables - Reference – Select Values to Manage Page. |
|
Done |
Saves the data entered on the current page to the database. If the Reference table’s Status = ‘Enabled’: Performs the validation rules and if at least one validation fails: · Sets the Reference Table’s Status to ‘Disabled’; Returns to and displays the CCV Admin – Tables - Reference – Names Page. |
|
Undo |
Disabled upon first entry to the screen and
whenever a save is posted to the database. Enabled as soon as any changes are made to
the fields on this screen. When selected, it undoes any changes made to
the fields on the current screen since the last database save, disables the
Undo button; and redisplays this screen. |
|
? |
Displays the help for the selected entry. |
A Reference table can
be composed of a combination of LOV or Reference tables and a value for each
combined entry. This screen is displayed when adding a reference table to allow
the user to define whether it will be a LOV or Reference table being added to
the Reference and LOV tables grid on the Reference Details screen.
Figure 3-47 CCV
Admin - Tables – Reference - Select Type of Table Window

Table 3-76 Fields for CCV Admin - Tables – Reference -
Select Type of Table screen
|
Field |
Validation Rules |
|
Type of Table |
Must choose whether the table being included is a LOV or Reference type of table. |
Table 3-77 Buttons for CCV Admin - Tables – Reference -
Select Type of Table screen
|
Button |
Functionality |
|
Next |
Displays the CCV
Admin – Tables - Reference –Reference - Select Table page retaining the table
type selected. |
|
Cancel |
Returns to the CCV Admin – Tables - Reference
– Reference Details Page. |
|
? |
Displays the help for the selected entry. |
This screen is
displayed to allow the user to select which LOV or Reference table to add to
the Reference and LOV tables grid on the Reference Details screen.
Figure 3-48 CCV
Admin - Tables – Reference - Select Table Window
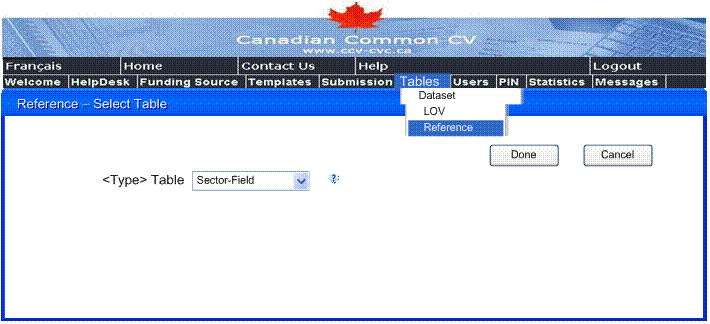
Table 3-78 Fields for CCV Admin - Tables – Reference -
Select Table screen
|
Field |
Validation Rules |
|
<Type> |
Display only of Type of Table selected on the Reference – Select Type of Table page. |
|
Table |
If Table Type selected on Reference – Select Type of Table page = List of Values: Displays list of all List Of Values (LOV) Table Names with Status = ‘Enabled’ (in language that had been selected by user) to allow user to select the LOV table this field should be linked to; Otherwise, Table Type selected on Reference – Select Type of Table page = Reference, so: Displays list of all Reference Table Names with Status = ‘Enabled’ (in language that had been selected by user) to allow user to select the Reference table this field should be linked to. |
Table 3-79 Buttons for CCV Admin - Tables – Reference -
Select Table screen
|
Button |
Functionality |
|
Done |
Saves the selections entered to the database. If the Reference table’s Status = ‘Enabled’: Performs the validation rules and if at least one validation fails: · Sets the Reference table’s Status to ‘Disabled’; Saves change to database; Returns to and displays the CCV Admin – Tables - Reference – Reference Details Page with the data refreshed. |
|
Cancel |
Returns to the CCV Admin – Tables - Reference
– Reference Details Page. |
|
? |
Displays the help for the selected entry. |
This screen is
displayed when the user selects the Display Values button on the Reference
Details screen. It requires the user to select values for the top level LOV or
Reference type field(s) before pressing the Manage Values button to display the
CCV Admin – Tables - Reference – Manage Values Page.
Figure 3-49 CCV
Admin - Tables – Reference - Select Values to Manage Window (example of screen
for definition of Sector-Field Reference table with high-level LOV type of
field)

Figure 3-50 CCV
Admin - Tables – Reference - Select Values to Manage Window (example of screen
for definition of Sector-Field-Discipline Reference table with high-level
Reference type of field)
Table 3-80 Fields for CCV Admin - Tables – Reference -
Select Values to Manage Window screen
|
Field |
Validation Rules |
|
<High level field(s)> |
Mandatory to allow user to Manage Values of table. Listing of high level field(s) for the reference table being defined: A Reference type field will be disabled with an enabled Find button which, when pressed, will open the Search and Select screen for selection of the field’s value; and A LOV type of field will be enabled to allow the value to be selected from a drop-down list on the current screen. |
Table 3-81 Buttons for CCV Admin - Tables – Reference -
Select Values to Manage Window screen
|
Button |
Functionality |
|
Find |
Opens the Search and Select Page for the
associated reference type of high-level field to allow the user to select the
value they wish to manage. |
|
Manage Values |
Performs the
validation rules and if at least one validation fails: · Displays applicable error message(s); Otherwise, if there are no validation errors: · Displays the CCV Admin – Tables - Reference – Manage Values Page retaining the selected high-level field values. |
|
Done |
Returns to the CCV Admin – Tables - Reference
– Reference Details Page. |
|
? |
Displays the help for the selected entry. |
This screen will be
displayed when a user wishes to display or manage the values for a Reference
table and has selected the values for the high-level fields. The user may then
add or edit the lowest level of values pertaining to the displayed high-level
values for the Reference table.
Figure 3-51 CCV
Admin - Tables – Reference – Manage Values Window with example of managing
values for the Sector-Field-Discipline reference table for a specified Sector
and Field value

Table 3-82 Fields for CCV Admin - Tables – Reference –
Manage Values screen
|
Field |
Validation Rules |
|
<High level field(s)> |
Display only list of high level field(s) for the reference table being defined. |
|
Lowest Level Field Values grid |
Lists all values for the Reference table for those data instances where the high level field values are those displayed in <High level field(s)>. The combination of values for all elements of a Reference value entry must be unique (i.e. for the Sector-Field-Discipline reference table, it is valid to have ‘Actuarial Science’ in both ‘Natural Sciences and Engineering - Mathematical Sciences - Actuarial Science’ as well as in ‘Social Sciences Humanities - Management - Actuarial Science’, but it is not valid to have 2 entries with ‘Humanities - Management - Actuarial Science’). |
|
System ID |
Display only of Reference Value’s UUID code |
|
Code |
Display only of business code for Reference Value. |
|
<Name> |
Displays Value (English Element Name or French Element Name depending on UI language) for lowest level field. An enabled table must have at least 1 enabled value in order to be valid. English Element Names must be unique within a Reference Table for a data instance of higher level fields. French Element Names must be unique within a Reference Table for a data instance of higher level fields. |
|
Status |
Display only of <Name>’s Status |
|
Errors |
Errors: Display only of icon in the event of a validation error for the associated grid entry. |
Table 3-83 Buttons for CCV Admin - Tables – Reference –
Manage Values screen
|
Button |
Functionality |
|
Add |
Enabled Displays the Reference - Values page in Add mode. |
|
Edit |
Enabled Displays the Reference - Values page in
Edit mode for the selected entry. |
|
Done |
If the Reference table’s Status = ‘Enabled’: Performs the validation rules and if at least one validation fails: · Sets the Reference table’s Status to ‘Disabled’; Saves change to database; Returns to and displays the CCV Admin – Tables - Reference – Select Values to Manage Page. |
|
? |
Displays the help for the selected entry. |
This screen is
displayed when adding or editing an entry in the Lowest Level Field Values grid
on the CCV Admin - Tables – Reference – Manage Values Window.
Note: The combination
of values for all elements of a Reference value entry must be unique (i.e. for
the Sector-Field-Discipline reference table, it is valid to have ‘Actuarial
Science’ in both ‘Natural Sciences and Engineering - Mathematical Sciences -
Actuarial Science’ as well as in ‘Social Sciences Humanities - Management -
Actuarial Science’, but it is not valid to have 2 entries with ‘Humanities -
Management - Actuarial Science’)
Figure 3-52 CCV
Admin - Tables – Reference - Values Window
Table 3-84 Fields for CCV Admin - Tables – Reference –
Values screen
|
Field |
Validation Rules |
|
Status |
Display only of Status of Reference table Element |
|
Table Name |
Display only. |
|
<High level field(s)> |
Display only of values for data instance of high level field(s) for the values being defined. |
|
Business Code |
Optional Business Code for Value |
|
<Lowest Level Field > English Value |
Mandatory English Value of Lowest Level Field English Element Names must be unique within a Reference Table for a data instance of higher level fields |
|
<Lowest Level Field > French Value |
Mandatory French Value of Lowest Level Field French Element Names must be unique within a Reference Table for a data instance of higher level fields |
Table 3-85 Buttons for CCV Admin - Tables – Reference –
Values screen
|
Button |
Functionality |
|
Disable |
Only displayed and enabled if Status of
Reference Table Value is ‘Enabled’. Saves the data entered on the current
page to the database and changes Status of Reference Table Value to
‘Disabled’. Redisplays this screen. |
|
Enable |
Only displayed and enabled if Status of
Reference Table Value is ‘Disabled’. Saves the data entered on the current page to the database. Performs the validation rules and if at least one validation fails: ·
Redisplays this screen with
error message displayed at top of screen ‘Cannot enable due to validation
errors’; Otherwise, If validation rules are successful: ·
Changes Status of Reference
Table Value to ‘Enabled’ and saves change to database; ·
Redisplays this screen. |
|
Done |
Saves the data entered on the current page to the database. If the Status of the Reference Table Value = ‘Enabled’: Performs the validation rules and if at least one validation fails: · Sets the Status of the Reference Table Value to ‘Disabled’; · Saves change to database; Returns to and displays the CCV Admin – Tables - Reference – Manage Values Page. |
|
Undo |
Disabled upon first entry to the screen and
whenever a save is posted to the database. Enabled as soon as any changes are made to
the fields on this screen. When selected, it undoes any changes made to
the fields on the current screen since the last database save, disables the
Undo button; and redisplays this screen. |
|
? |
Displays the help for the selected entry. |
The window will display one or more drop-downs, which come from the LOV(s) and reference table(s) that make up the reference table being searched; there will always be a text box at the lowest level;
Only the top-level drop-down will be enabled initially until a value is selected, as the user must search the drop-downs in a hierarchy to get the cascading effect; lower-level drop-downs are enabled, once a parent value is selected.;
The ‘lowest-level’ text box is always enabled.
Note: that if a user then decides to select another value in the first-level drop-down, the window will refresh and the 2nd drop-down will be cleared, however, any value in the lowest-level text box will remain.
Figure 3-53
Search and Select Window (example with a high level LOV type of field)

Figure 3-54
Search and Select Window (example with a high level Reference type of field)

Table 3-86 Fields for Search and Select screen
|
Field |
Validation Rules |
|
<High level field(s)> |
Optional Listing of one or more drop-downs (one drop-down for each high level field for the reference table being searched). If an entry is selected for a drop-down,
a search will look for all field Values (i.e. English Element Name or French
Element Name depending on UI language) matching the selected value for the
high level field(s). |
|
<Lowest Level Field Name> |
Optional If entered, a search will retrieve all field Values (i.e. English
Element Name or French Element Name depending on UI language) containing the
entered text for the lowest level field. |
|
Search Results |
Lists all Values (Element English Name or French Name depending on the language of the UI) for the selected Reference Table that satisfy any entered search criteria. |
|
<Columns> |
Display only of Value (Element English Name or French Name depending on the language of the UI) for applicable field. |
Table 3-87 Buttons for Search and Select screen
|
Button |
Functionality |
|
Search |
If selected,
populates the Search Results grid with the reference
table values that satisfy the search criteria. When the user
presses Search, if the search returns over 200 results, only the first 200
will be returned, along with a message requesting them to re-enter their
criteria to refine the search. |
|
Select icon |
If selected: Performs the validation rules and if at least one validation fails, redisplays the current page to display the appropriate error message(s). If validation rules are successful: · Returns to and re-displays the calling screen with the selected entry. |
|
Cancel |
Returns to the calling
screen without retaining any
data entered on this screen. |
|
? |
Displays Help for associated field |
This menu item is only accessible by a SuperAdmin or a Program or Agency Admin. It allows the user to view, add, modify or delete an admin user for a funding source.
The figure below illustrates the window navigation flow through the CCV Admin – Users menu.
Figure 3-55 Navigation Flow for CCV
Admin – Users menu item
This window is
displayed when a SuperAdmin user selects the Users menu item. It allows the SuperAdmin user to select the
funding source for the users they wish to view, add, modify or delete before
selecting the Next button to navigate to the List of Admin Users page. All
other types of users (Agency or Program Admins) will, upon selecting the Users
menu item, go directly to the List of Admin Users page, with their associated
funding source selected for them by the application
Figure 3-56 CCV Admin – Users –
SuperAdmin – Select Funding Source Window
Table 3-88 Fields
for CCV Admin – Users – SuperAdmin – Select Funding Source screen
|
Field |
Validation Rules |
|
Funding Source |
List of acronyms of all funding sources + the ‘CCV’ generic entity. Mandatory |
Table 3-89 Buttons
for CCV Admin – Users – SuperAdmin – Select Funding Source screen
|
Button |
Functionality |
|
Next |
Displays the CCV
Admin – List of Admin Users page for the selected Funding Source. |
|
? |
Displays the help for the selected entry. |
This screen displays a
grid containing a list of all admin users associated to the displayed funding
source. On this window, the user may add, edit or delete a user for that
funding source.
Figure 3-57 CCV Admin - List of Admin Users Window

Table 3-90 Fields
for CCV Admin – List of Admin Users screen
|
Field |
Validation Rules |
|
Funding Source |
Display only |
|
User List |
Lists all users (for the selected Funding Source) who have access to the Administrative Tool. |
|
Username |
Display only |
|
First Name |
Display only |
|
Family Name |
Display only |
|
Roles |
Display only If more than one role is associated to the user, the roles are listed, one per line. |
|
|
Display only |
|
Phone |
Display only |
|
Errors |
Display only of icon in the event of a validation error for the associated grid entry. |
Table 3-91 Buttons
for CCV Admin – List of Admin Users screen
|
Button |
Functionality |
|
Add |
Displays the Admin User Details page in Add
mode. |
|
Edit |
Displays the Admin User Details page in Edit
mode. |
|
Delete |
Displays a
confirmation screen with ‘Yes’ and ‘No’ options: If ‘Yes’ is selected: Deletes the user and his/her associated data from the CCV Admin database, writes a record to the Audit table and redisplays this window; Otherwise, if ‘No’
is selected: Redisplays
this screen without making any changes. |
This screen allows the
Admin user to add and edit details and assign role(s) for an Admin user.
Note:
· At least one role must be assigned to an Admin User;
· There can only be entries in the Templates grid for a CV Reviewer role;
· The CV Reviewer role and the SuperAdmin role cannot be combined with any other role(s);
· The SuperAdmin role can only be assigned by a SuperAdmin and only for Funding Source ‘CCV’.
Figure 3-58 CCV Admin – Admin User
Details Window

Table 3-92 Fields
for CCV Admin - Admin User Details screen
|
Field |
Validation Rules |
|
Funding Source |
Display only |
|
Username |
Display only |
|
First Name |
Mandatory |
|
Middle Name |
Optional |
|
Family Name |
Mandatory |
|
|
Mandatory Must be valid email format |
|
Phone |
Mandatory Must be numeric |
|
Roles |
At least one Role must be assigned. |
|
SuperAdmin |
The SuperAdmin role label and drop-down list is only visible to a user with the SuperAdmin role who the generic ‘CCV’ funding source. It cannot be combined with any other role. |
|
Agency or Program Administrator |
N/A |
|
Helpdesk Administrator |
N/A |
|
Template Administrator |
N/A |
|
CV Reviewer |
The CV Reviewer role cannot be combined with any other role. |
|
Templates |
This grid is only used for a user with a CV Reviewer role. Its purpose is to limit the submissions that the user can view on the Submissions screen to those CV’s that were submitted to templates listed in their Templates grid. |
|
Template |
Display only of Name of Template associated to the User being added / modified. The Templates grid should only have entries if the user has a CV Reviewer role. |
|
Errors |
Display only of icon in the event of a validation error for the associated grid entry. |
Table 3-93 Buttons
for CCV Admin - Admin User Details screen
|
Button |
Functionality |
|
Generate Username button or Reset Password
button |
Displayed and enabled with label ‘Generate Username’ only if the user does not have a username; If the user already has a username, this button is displayed and enabled with label ‘Reset Password’. When Generate Username button is pressed: Validates the data entered: If at least one validation fails, refreshes display of the current page to display the appropriate message(s); Otherwise, If validation rules are successful: · Saves the user details data entered, generates a username and password and sends 2 separate emails to the user: 1 with title ‘ Welcome to CCV Administration’ containing the username, and the 2nd with title ‘Details of CCV Administration’ containing the password, and re-displays the current screen; When Reset Password button is pressed: Validates the data entered: If at least one validation fails, refreshes display of the current page to display the appropriate message(s); Otherwise, If validation rules are successful: · Saves the user details data entered, generates a new password and sends an email to the user with title ‘Details of CCV Administration’ containing the new password, and redisplays the current screen. |
|
Save |
Displayed and Enabled if the user has a username; Otherwise hidden. When pressed: Validates the data entered: If at least one validation fails, refreshes the display of the current page to display the appropriate message(s); Otherwise, If validation rules are successful: · Saves the changes entered on the current page to the database and redisplays the current screen, hiding the Generate Username button. |
|
Prev |
Returns to the List of Admin Users Page. |
|
Add button for Templates grid |
Performs the validation rules and if at least one validation fails, refreshes the display of the current page to display the appropriate message(s). If validation rules are successful: Checks to make sure that CV Reviewer role was selected and that there are remaining enabled templates associated to funding source and if so: Saves the data entered on the current page to the database: If the screen was opened in Add mode, the new value will be saved as a new entry for the Users grid that had been displayed on the CCV Admin – Users – List of Admin Users Page; otherwise, it was opened in Edit mode and the changes will be applied to the selected User and saved to the database. Displays the CCV
Admin – Select Template to Include in Grid page in Add mode. |
|
Delete button for an entry in the Templates grid |
Displays confirmation screen with ‘Yes’ and ‘No’ options: · If yes is pressed: Performs the validation rules and if at least one validation fails, refreshes the display of the current page to display the appropriate message(s). If validation rules are successful: Checks to make sure that CV Reviewer role was selected before it deletes the selected Template from the User’s Templates grid, saves the changes and refreshes the display of this screen; ·
If no is pressed: Redisplays the current page. |
|
? |
Displays the help for the selected entry. |
This screen is opened
when a user is setting up a CV Reviewer type of user and presses the Add or
Edit button on the Templates grid of the CCV Admin - Admin User Details Window
to select a template to include in the Templates grid. The purpose for the list of templates for a
CV Reviewer is to limit the submissions that the user can view on the
Submissions screen to those CV’s that were submitted to templates listed in
their Templates grid. Note: This window
will only ever be displayed for a Funding Source with associated templates.
Figure 3-59 CCV Admin – Select
Template to Include in Grid Window

Table 3-94 Fields
for CCV Admin – Select Template to Include in Grid screen
|
Field |
Validation Rules |
|
Funding Source |
Display only of Acronym of funding source of user currently logged in or selected by SuperAdmin on Users – SuperAdmin – Select Funding Source screen. This window would only ever be displayed for a Funding Source with associated Templates. |
|
Select Template to include |
Mandatory Lists those ‘active’ templates that are associated to the displayed Funding Source and not already in the Templates grid for this user. |
Table 3-95 Buttons
for CCV Admin – Select Template to Include in Grid screen
|
Button |
Functionality |
|
Done |
Saves the data entered on the current page to the database: If the screen was opened in Add mode, the new value will be saved as a new entry for the Templates grid that had been displayed on the CCV Admin – Admin User Details Page; otherwise, it was opened in Edit mode and the changes will be applied to the selected Template entry and saved to the database. Returns to the CCV Admin – Admin User Details Page refreshing the display of the screen. |
|
Cancel |
Returns to the CCV Admin – Admin User Details Page without saving any data entered on the current page. |
|
? |
Displays the help for the selected entry. |
This screen is opened when the Admin user (Agency or Program Admin or a SuperAdmin) selects the PIN menu item.
The figure below illustrates the window navigation flow through the CCV Admin – PIN menu.
Figure 3-60 Navigation Flow of CCV Admin Tool – PIN menu item
The top portion of this screen contains the search criteria fields, which, if filled, will be used to populate the search results (Users) grid in the lower portion of the screen with all users that match the search criteria and who do not have PIN Status = ‘Valid’. If the user presses the Validate button beside a user, it will force the user’s PIN status for that agency to be ‘valid’.
Note: If the search returns over 200 results, only the first 200 will be returned, along with an error message requesting them to re-enter their criteria to refine the search.
Figure 3-61 CCV Admin - PIN Validation - Search and Validate Window
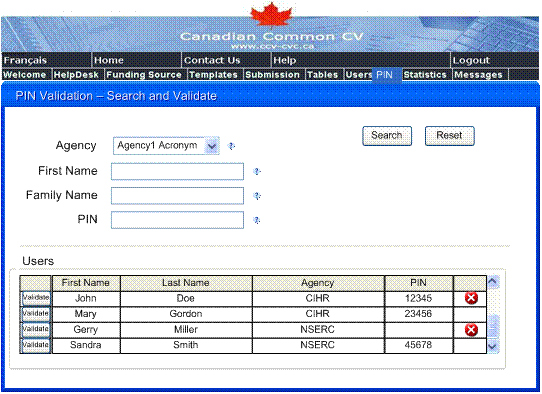
Table 3-96 Fields for CCV Admin - PIN Validation - Search
and Validate screen
|
Field |
Validation Rules |
|
Agency |
For a SuperAdmin, will be enabled and display list of acronyms for all ‘Active’ agencies that require PIN validation (i.e. that have PIN Validation Required = ‘Yes’). For a non-SuperAdmin, will be disabled and defaulted to the agency this Admin user is associated to. Optional for a SuperAdmin |
|
First Name |
Optional |
|
Family Name |
Optional |
|
PIN |
Optional |
|
Users |
Hidden upon first entry to the screen or after Reset button is pressed. Displayed only after Search button has been pressed. Displays all PINs entered by users that have not yet been validated (i.e. do not have PIN Status = ‘Valid’). Sorted alphabetically by Family Name. |
|
First Name |
Display only of First Name of User. |
|
Last Name |
Display only of Last Name of User. |
|
Agency |
Display only of English Agency Acronym if on English screen, and French Agency Acronym if on French screen. |
|
PIN |
Display only of PIN for the User for the agency. |
|
Errors |
Display only of icon in the event of a validation error for the associated grid entry. |
Table 3-97 Buttons for CCV Admin - PIN Validation - Search
and Validate screen
|
Button |
Functionality |
|
Search button |
Performs the search to populate the search
results (Users) grid with all users that match the search criteria and who do
not have PIN Status = ‘Valid’. Note: When the user
presses Search, the result set will be determined; if the search returns over
200 results, only the first 200 will be returned, along with error message requesting
them to re-enter their criteria to refine the search. |
|
Reset button |
Resets the search criteria fields to their
default values and empties and hides the search results (Users) grid. |
|
Validate icon for each entry in Users grid |
Displays a confirmation screen with ‘Yes’ and ‘No’ options: If ‘No’ is selected: · Redisplays this screen; Otherwise, if ‘Yes’ is selected: · Sets the PIN’s Status to ‘Valid’ for the selected user and saves update to database; · Writes record to audit file; · Redisplays this screen. |
|
? |
Displays help for the selected entry. |
This Menu item is accessible to Agency or Program Administrators or to SuperAdmins. It contains 2 sub-menu items: System and Usage. The System sub-menu item will only be displayed and enabled for a SuperAdmin; it will be hidden for a non-SuperAdmin; whereas the Usage sub-menu item will be displayed and enabled for a SuperAdmin, Program Admin or Agency Admin.
This screen is used to
display system statistic information such as the number of PDFs generated or
number of Registrations within a date range or a listing of those users who
have not accessed the application since a certain date. The user may enter the
Note: When the user
presses Search and the Since Date search parameter is used, if the search
returns over 200 results to the Application non-access Users grid, only the
first 200 will be returned, along with a message requesting them to re-enter their
criteria to refine the search.
Figure 3-62 CCV Admin – Statistics -
System Window
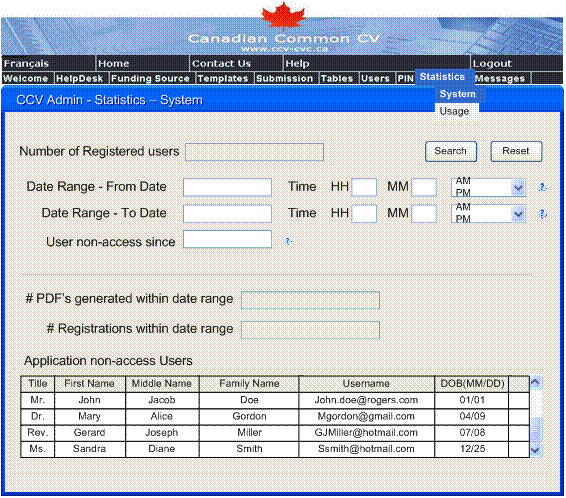
Table 3-98 Fields
for CCV Admin – Statistics – System screen
|
Field |
Validation Rules |
|
Number of Registered users |
Display only of calculated number of registered CCV users (i.e. researchers) in the application |
|
Date Range - From |
N/A |
|
From Date |
When text box is touched, calendar date picker opens up. If user selects a date using the date picker, it will populate the text box. User can over-type date in text box. Must be a valid date that is <= current date. If Date
Range – To Date/Time has been entered, Date Range - From Date/Time must be entered and it must be <= |
|
From Time |
If From Date was entered, but no time entered, sets time to 00:00 AM |
|
Date Range - To |
N/A |
|
To Date |
When text box is touched, calendar date picker opens up. If user selects a date using the date picker, it will populate the text box. User can over-type date in text box. Date must be a valid date. If Date Range – From Date has been entered, the Date Range - To Date must be entered and it must be >= Date Range – From Date. |
|
To Time |
If To Date was entered, but no time entered, sets time to 11:59 PM. |
|
User non-access since |
When text box is touched, calendar date picker opens up. If user selects a date using the date picker, it will populate the text box. User can over-type date in text box. Date must be a valid date <= current date. |
|
# PDF’s generated within date range |
Empty until search is performed. Display only calculated number of PDF’s that were generated with generated date > or = Date Range – From Date and < or = Date Range – To Date. |
|
# Registrations within date range |
Empty until search is performed. Display only calculated number of registrations (i.e. newly registered Application users) with created date > or = Date Range – From Date and < or = Date Range – To Date. |
|
Application non-access Users |
Empty until search is performed. Lists all Application users (i.e. researchers) satisfying the search criteria (i.e. where last login date < User non-access since date entered). |
|
First Name |
Display only of first name of researcher |
|
Middle Name |
Display only of middle name of researcher |
|
Family Name |
Display only of family name of researcher |
|
Username |
Display only of username of researcher |
|
DOB (MM/DD) |
Display only of Birth Month/Day of researcher |
|
Errors |
Display only of icon in the event of a validation error for the associated grid entry. |
Table 3-99 Buttons
for CCV Admin – Statistics – System screen
|
Button |
Functionality |
|
Search button |
Validates the data entered: If at least one validation fails, · Displays the appropriate message(s). Otherwise: · If date/times have been entered in the Date Range – From Date/Time and Date Range – To Date/Time fields: Calculates and displays the number of PDF’s that were generated with generated date > or = Date Range – From Date/Time and < or = Date Range – To Date/Time; Calculates and displays the number of Users
registered with created date > or = Date
Range – From Date/Time and < or =
· If there is a date in the User non-access since field: Performs the search to populate the search results (Application non-access Users) grid with all users whose last login date < or = the User non-access since date; Note: When the user presses Search, the result set will be determined; if the search returns over 200 results, only the first 200 will be returned, along with a message requesting them to re-enter their criteria to refine the search. |
|
Reset button |
Resets the search criteria fields to their
default values and empties and empties the search results (Application
non-access Users) grid. |
|
? |
Displays the help for the selected entry. |
This screen is used to
display the usage statistics such as the Number of CVs submitted, automatically
transferred or manually downloaded within a date range. The user may enter the
From and To Dates before pressing the Search button.
Figure 3-63 CCV Admin – Statistics -
Usage Window
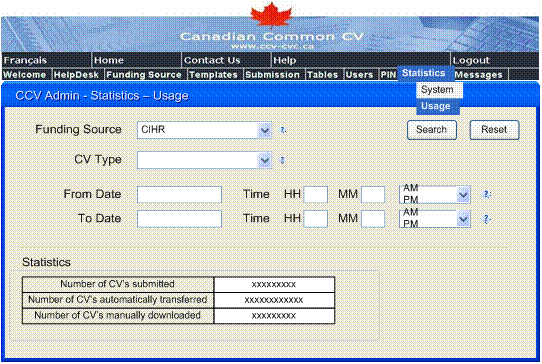
Table 3-100 Fields
for CCV Admin – Statistics – Usage screen
|
Field |
Validation Rules |
|
Funding Source |
For a SuperAdmin: Enabled list of English or French acronyms of all funding sources, depending on the language of the UI, as well as a null option. For an Agency or Program Admin: Disabled and defaulted to English or French Acronym (depending on language of UI) for funding source associated to non-SuperAdmin user. Optional for a SuperAdmin. If the Funding Source is null, the calculations will be based on count of total number of submissions (i.e. with no double count. The count for Number of CV’s automatically transferred, as well as the count for Number of CV’s manually downloaded, have a double-count for those submitted through a Program – i.e. they are included in the count for the program as well as the count for the agency). |
|
CV Type |
Optional For a SuperAdmin: List of CV Types (templates) for all funding sources. For a non-SuperAdmin: List of all CV Types for the connected user’s funding source. |
|
From Date |
Optional but if To Date was entered, From Date must be entered and From Date/Time must be <= To Date/Time. When text box is touched, calendar date picker opens up. If user selects a date using the date picker, it will populate the text box. User can over-type date in text box. Must be a valid date. |
|
From Time |
Optional. Must be a valid time. If From Date was entered, but no time entered, sets time to 00:00 AM. |
|
To Date |
Optional but if From Date was entered, To Date must be entered and From Date/Time must be <= To Date/Time. When text box is touched, calendar date picker opens up. If user selects a date using the date picker, it will populate the text box. User can over-type date in text box. Must be a valid date. |
|
To Time |
Optional Must be a valid time. If To Date was entered, but no time
entered, sets time to 11:59 PM. |
|
Statistics |
Empty until Search is performed. Lists calculated system statistics (Number of CV’s submitted, Number of CV’s automatically transferred, Number of CV’s manually downloaded). |
|
Number of CV’s submitted |
Display only of calculated number of Submission Requests satisfying the search criteria (Funding Source, CV Type, From Date/Time, To Date/Time). Note: For a Program, this is the number of CV’s submitted to the program (i.e. one submission, even if there are multiple agencies for the program); For an Agency, this is the number of CV’s submitted directly to that agency (i.e. excluding any CV’s submitted to the agency through a program). |
|
Number of CV’s automatically transferred |
Display only of calculated number of Submissions that were automatically transferred successfully (i.e. Submission status = ‘Transferred’, satisfying the search criteria (Funding Source, CV Type, From Date/Time, To Date/Time). Note: For a Program, this is the total of all CV’s automatically transferred for all agencies within the program, but only those submitted to those agencies through the program (i.e. funding CV’s submitted directly to the agencies are excluded) – successful automated transfers only. For an Agency, this is the total of all CV’s automatically transferred that were submitted directly to that agency as well as those submitted to that agency through a program – successful transfers only. |
|
Number of CV’s manually downloaded |
Display only of calculated number of Submissions that were manually downloaded (i.e. Submission status = ‘Downloaded by Agency’, satisfying the search criteria (Funding Source, CV Type, From Date/Time, To Date/Time). Note: For a Program, this is the total of all downloads to all agencies within that program, but only those submitted to those agencies through the program (i.e. funding CV’s submitted directly to the agencies are excluded). For an Agency, this is the total of all CV’s downloaded that were submitted directly to that agency, as well as those submitted through a program to that agency. |
Table 3-101 Buttons
for CCV Admin – Statistics – Usage screen
|
Button |
Functionality |
|
Search button |
Validates the entered data: If at least one validation fails: · Displays the appropriate message(s); Otherwise, if no validation failures: · Performs the search to calculate and display the entries in the Statistics grid. ·
Note: When the user presses
Search, the result set will be determined; if the search returns over 200
results, only the first 200 will be returned, along with message requesting
them to re-enter their criteria to refine the search. |
|
Reset button |
Resets the search criteria fields to their
default values. |
|
? |
Displays the help for the selected entry. |
This menu item is only accessible by a SuperAdmin to allow them to manage the system messages that are displayed on the CCV Reviewer’s Welcome screen.
This screen is
displayed when a SuperAdmin selects the Messages menu item. It allows the
SuperAdmin to view, add, modify and delete messages that could appear on the
System Message region of the Common CV Welcome Page.
Figure 3-64 CCV Admin – Message List
Window
Table 3-102 Fields
for CCV Admin – Message List screen
|
Field |
Validation Rules |
|
Message List |
Lists all system messages that could appear in the System Messages area of the CCV application Welcome Page. Ordered in descending order of Valid From dates. |
|
Priority |
Display only |
|
Status |
Display only |
|
Valid From |
Display only |
|
Valid To |
Display only |
|
English Title |
Display only |
|
French Title |
Display only |
|
Errors |
Display only of icon in the event of a validation error for the associated grid entry. |
Table 3-103 Buttons
for CCV Admin – Message List screen
|
Button |
Functionality |
|
Add |
Displays the Message Detail page in Add mode. |
|
Edit |
Displays the Message Detail page in Edit mode. |
|
Delete |
Displays a
confirmation screen with ‘Yes’ and ‘No’ options: If ‘Yes’ is selected: ·
Deletes
the selected message from the database; and redisplays this screen; Otherwise: ·
Redisplays this screen. |
This screen is
displayed when a user selects the Add or Edit button for the Message List grid
on the CCV Admin – Message List window.
Note: A message will
only be displayed on the System Message region of the Common CV Welcome Page if
it is ‘Active’ (i.e. it is enabled and the current date is between or equal to
the Start and End Dates. A blank
start date is invalid, but a blank end date means there is no end date set, so a
message is also active if the end date is empty and the message is enabled and
the current date is greater than or equal to the start date).
Figure 3-65 CCV Admin – Message Details
Window
Table 3-104 Fields
for CCV Admin – Message Details screen
|
Field |
Validation Rules |
|
Status |
Display only If the Status of the Message is ‘Enabled’, and the current date is within the Valid From and Valid To dates, then it will be displayed in the Messages area of the CCV application Welcome screen. |
|
Priority |
Mandatory |
|
Valid From |
Date: When text box is touched, calendar date picker opens up. If user selects a date using the date picker, it will populate the text box. User can over-type date in text box. Mandatory, but if no date selected, sets Valid From Date to current date. Must be a valid date. Time: If entered, must be a valid time. If no time entered, sets Valid From Time to 00:00 am. |
|
Valid To |
Optional. Date: When text box is touched, calendar date picker opens up. If user selects a date using the date picker, it will populate the text box. User can over-type date in text box. If entered, must be a valid date. Time: If entered, must be a valid time. If Valid To Date is entered, but Valid To time is empty, sets Valid To Time to 11:59 pm Note: If
entered, Valid To Date/Time must be >= Valid From Date/Time. |
|
English Title |
Mandatory. |
|
French Title |
Mandatory. |
|
English Text |
Mandatory. |
|
French Text |
Mandatory. |
|
Errors |
Display only of icon in the event of a validation error for the associated grid entry. |
Table 3-105 Buttons
for CCV Admin – Message Details screen
|
Button |
Functionality |
|
Done |
If the screen is in Add mode and no changes have yet been made and/or saved to the database: · Cancels out of this screen without saving anything to the database; and returns to and displays the CCV Admin – Message List page with the data refreshed. Otherwise, if the screen is either in Edit mode, or if it is in Add mode but changes have been made on the screen or saved to the database: · Saves the data entered on the current page to the database. If the screen was opened in Add mode, the new instance will be saved to the database; otherwise the changes entered will be saved to the database; · If the Message’s Status = ‘Enabled’, performs the validation and if at least one validation fails, sets the Message’s Status to ‘Disabled’ and saves change to database; otherwise status remains as it was; · Returns to the CCV Admin – Message List page, refreshing the display. |
|
Disable |
Only displayed and enabled if Status of
Message is ‘Enabled’. Saves the data entered on the current page to the database: If the screen was opened in Add mode, the new value will be saved as a new entry for the Messages grid that had been displayed on the Message List page; otherwise, it was opened in Edit mode and the changes will be applied to the selected Message and saved to the database. Changes Status of Message to ‘Disabled’
and redisplays this screen. |
|
Enable |
Only displayed and enabled if Status of
Message is ‘Disabled’. Saves the data entered on the current page to the database: If the screen was opened in Add mode, the new value will be saved as a new entry for the Messages grid that had been displayed on the Message List page; otherwise, it was opened in Edit mode and the changes will be applied to the selected Message and saved to the database. Validates the entered data: If at least one validation fails, ·
Redisplays this screen with message
displayed at top of screen ‘Cannot enable due to validation errors’; Otherwise, If validation rules are successful: ·
Changes Status of Message to ‘Enabled’
and redisplays this screen. |
|
Undo |
Disabled upon first entry to the screen and
whenever a save is posted to the database. Enabled as soon as any changes are made to
the fields on this screen. When selected, it undoes any changes made to the fields on the current screen since the last database save, disables the Undo button; and redisplays this screen. |
|
? |
Displays the help for the selected entry. |
This menu item is accessible by any Admin to allow them to access the Login screen.
This screen is
displayed when a SuperAdmin accesses the CCV application. It allows them to
select the language of the User Interface (UI) before proceeding to the CCV
Splash page.
Figure 3-66 CCV Admin – Select
Language Window
Table 3-106
Fields for CCV Admin – Select Language screen
|
Field |
Validation Rules |
|
Canadian Common CV Admin |
Display only of picture for Canadian Common CV Admin application |
Table 3-107
Buttons for CCV Admin – Select Language screen
|
Button |
Functionality |
|
English |
Sets language of UI to English and performs displays CCV Admin
Splash screen in English |
|
Francais |
Sets language of UI to French and performs displays CCV Admin
Splash screen in French |
|
Important Notices |
Displays an English screen listing all
important notices. |
|
Avis Importants |
Displays a French screen listing all important notices. |
This screen is
displayed when a user selects either the English or the Francais button on the
CCV Admin – Select Language window, or if the user selects the Home menu item.
Figure 3-67 CCV Admin – Splash Window
Table 3-108
Fields for CCV Admin – Splash screen
|
Field |
Validation Rules |
|
Canadian Common CV Admin splash text |
Display only of splash text in French or English (depending on language of UI) for Canadian Common CV Admin application |
Table 3-109 Buttons
for CCV Admin – Splash screen
|
Button |
Functionality |
|
Important Notices |
Displays an English screen listing all
important notices. |
|
Avis Importants |
Displays a French screen listing all important notices. |